Package Installation
Introduction
This guide covers Trusted Analytics Platform installation and configuration.
Cloudera installation documentation can be found at: http://www.cloudera.com/content/cloudera-content/cloudera-docs/CM5/latest/Cloudera-Manager-Installation-Guide/cm5ig_install_cm_cdh.html .
Requirements
Operating System Requirements
These instructions are oriented towards Red Hat Enterprise Linux or CentOS version 6.6. Trusted Analytics Platform uses ‘yum’ for installation, ‘sudo’ for proper authority.
Cluster Requirements
Cloudera cluster 5.3.x with following services:
- HDFS
- SPARK
- Hbase
- Yarn(MR2)
- Zookeeper
Trusted Analytics Platform Python client supports Python 2.7.
Trusted Analytics Platform Package Installation
Adding Extra Repositories
The EPEL and Trusted Analytics Platform repositories must be installed on the REST server node and all spark nodes (master and worker). The Trusted Analytics Platform Dependency repository and the yum-s3 package must be installed before the Trusted Analytics Platform private repository.
EPEL Repository
Verify the installation of the “epel” repository:
$ sudo yum repolist
Sample output:
repo id                                    repo name
cloudera-cdh5                              Cloudera Hadoop, Version 5                                           141
cloudera-manager                           Cloudera Manager, Version 5.3.1                                        7
epel                                       Extra Packages for Enterprise Linux 6 - x86_64                    11,022
rhui-REGION-client-config-server-6         Red Hat Update Infrastructure 2.0 Client Configuration Server 6        2
rhui-REGION-rhel-server-releases           Red Hat Enterprise Linux Server 6 (RPMs)                          12,690
rhui-REGION-rhel-server-releases-optional  Red Hat Enterprise Linux Server 6 Optional (RPMs)                  7,168
If the “epel” repository is not listed, do this to install it:
..code:
$ wget http://download.fedoraproject.org/pub/epel/6/x86_64/epel-release-6-8.noarch.rpm
$ sudo rpm -ivh epel-release-6-8.noarch.rpm
Trusted Analytics Platform Dependency Repository
Some open source libraries are included to aid with the installation of the Trusted Analytics Platform. Some of these libraries are newer versions than what is available in RHEL, EPEL or CentOS repositories.
To add the dependency repository, do this:
$ wget https://trustedanalytics-dependencies.s3-us-west-2.amazonaws.com/ta-deps.repo
$ sudo cp ta-deps.repo /etc/yum.repos.d/
Alternatively, do this to build the dependency repository information file directly:
$ echo "[trustedanalytics-deps]
> name=trustedanalytics-deps
> baseurl=https://trustedanalytics-dependencies.s3-us-west-2.amazonaws.com/yum
> gpgcheck=0
> priority=1 enabled=1"  | sudo tee -a /etc/yum.repos.d/ta-deps.repo
This code is downloadable (open, copy, and paste).
Test the installation of the dependencies repository:
$ sudo yum info yum-s3
Results should be similar to this:
Available Packages
Name        : yum-s3
Arch        : noarch
Version     : 0.2.4
Release     : 1
Size        : 9.0 k
Repo        : trustedanalytics-deps
Summary     : Amazon S3 plugin for yum.
URL         : git@github.com:NumberFour/yum-s3-plugin.git
License     : Apache License 2.0
Installing the yum-s3 package allows access to the Amazon S3 repository. To install the yum-s3 package, do this:
$ sudo yum -y install yum-s3
Trusted Analytics Platform Private Repository
Create ‘/etc/yum.repos.d/ta.repo’:
$ echo "[trustedanalytics]
> name=trustedanalytics
> baseurl=https://trustedanalytics-repo.s3-us-west-2.amazonaws.com/release/latest/yum/dists/rhel/6
> gpgcheck=0
> priority=1
> s3_enabled=1
> key_id=ACCESS_TOKEN
> secret_key=SECRET_TOKEN" | sudo tee -a /etc/yum.repos.d/ta.repo
This code is downloadable (open, copy, and paste).
Note
Replace “ACCESS_TOKEN” and “SECRET_TOKEN” with appropriate tokens.
To verify the installation of the Trusted Analytics Platform repository, do this:
$ sudo yum info trustedanalytics-rest-server
Example results:
Available Packages
Name        : trustedanalytics-rest-server
Arch        : x86_64
Version     : #.#.#
Release     : ####
Size        : 419 M
Repo        : trustedanalytics
Summary     : trustedanalytics-rest-server-0.9
URL         : trustedanalytics.com
License     : Confidential
Troubleshooting Private Repository
The most common errors when using the private repository:
- Incorrect access token/key
- Incorect secret token/key
- The server time is out of sync with the world
Double check the access and secret keys in the ta.repo file.
AWS S3 will fail with access denied errors if the system time is out of sync with the website. To keep the system time in sync with the website run:
$ sudo service ntpd start
The Trusted Analytics Platform Dependency repository and the yum-s3 package must be installed before the Trusted Analytics Platform private repository.
To use the yum command inside a corporate proxy make sure the http_proxy and https_proxy environment variables are set.
The sudo command may need the -E option to maintain environment variables:
$ sudo -E yum command
Installing Trusted Analytics Platform Package
Installing On The Master Node
Install Trusted Analytics Platform Python REST server and its dependencies. Only one instance of the REST server needs to be installed. Installation location is flexible, but it is usually installed with the HDFS name node.
$ sudo yum -y install trustedanalytics-rest-server
Installing On A Worker Node
The Trusted Analytics Platform spark dependencies package needs to be installed on every node running the spark worker role.
$ sudo yum -y install trustedanalytics-spark-deps trustedanalytics-python-rest-client
REST Server Configuration
From the postgresql client, create a new database and user in postgresql. See the section on postgresql.
Configuration Script
The server configuration is semi-automated via the use of a Python script ‘/etc/trustedanalytics/rest-server/config.py’. It will query Cloudera Manager for the necessary configuration values and create a new ‘application.conf’ file based on the ‘application.conf.tpl’ file. The script will also fully configure the local PostgreSQL installation to work with the Trusted Analytics Platform server.
To configure Trusted Analytics Platform installation, do this:
$ cd /etc/trustedanalytics/rest-server/
$ sudo ./config
Answer the prompts to configure the cluster. To see an example of the prompts see Configuration Script.
The script goes through all the necessary configurations to get the Trusted Analytics Platform service running. The script can be run multiple times but there is a danger that configuring the database multiple times can wipe out a users data frames and graphs.
Command line arguments can also be supplied for every prompt. If a command line argument is given, no prompt will be presented. To get a list of all the command line arguments for the configuration script, run the same command with –help:
$ sudo ./config --help
Manual Configuration
This section is optional, but informative if additional changes to the configuration file are needed. (Skip section).
/etc/trustedanalytics/rest-server/application.conf
The REST server package provides a configuration template file which must be used to create a configuration file. Copy the configuration template file ‘application.conf.tpl’ to ‘application.conf’ in the same directory, like this:
$ cd /etc/trustedanalytics/rest-server
$ sudo cp application.conf.tpl application.conf
Open the file with a text editor:
$ sudo vi application.conf
All of the changes that need to be made are located at the top of the file. See Appendix A — Sample Application Configuration File for an example ‘application.conf’ file.
Configure File System Root
Replace the text “invalid-fsroot-host” with the fully qualified domain of the HDFS Namenode.
Example:
fs.root = "hdfs://invalid-fsroot-host/user/atkuser"
Becomes:
fs.root = "hdfs://localhost.localdomain/user/atkuser"
If the HDFS Name Node port does not use the standard port, specify it after the host name with a colon:
fs.root = "hdfs://localhost.localdomain:8020/user/atkuser"
Configure Spark Master Host
Update “invalid-spark-master”.
To run Spark on Yarn in yarn-cluster mode, set:
spark.master = yarn-cluster
To run Spark on Yarn in yarn-client mode, set:
spark.master = yarn-client
Configure Spark Executor Memory
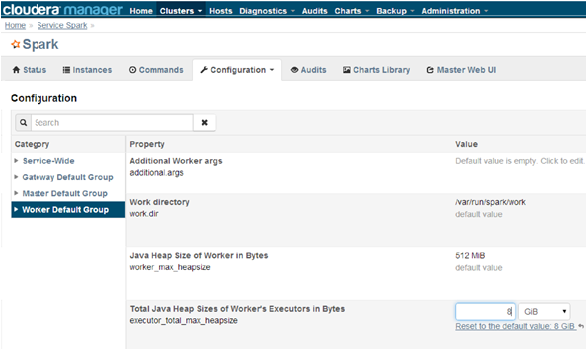
The Spark executor memory needs to be set equal to or less than what is configured in Cloudera Manager. The Cloudera Spark installation will, by default, set the Spark executor memory to 8g, so 8g is usually a safe setting.
Example:
spark.executor.memory = "invalid executor memory"
Becomes:
spark.executor.memory = "8g"
Click on the Spark service then configuration in Cloudera Manager to get executor memory. See Fig. 12.1.

Fig. 12.1 Spark Executor Memory
Set the Bind IP Address (Optional)
The Trusted Analytics Platform server can bind to all IP addresses, as opposed to just a single address, by updating the following lines and follow the commented instructions. This configuration section is also near the top of the file.
#bind address - change to 0.0.0.0 to listen on all interfaces
//host = "127.0.0.1"
Updating the Spark Class Path
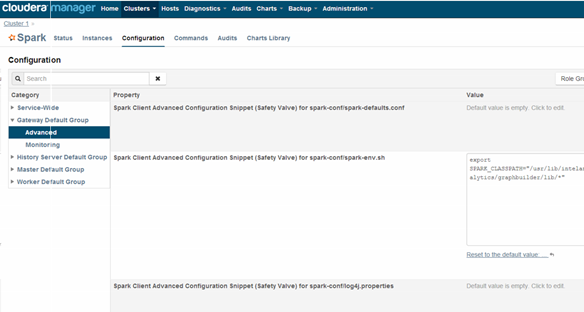
The automatic configuration script updates the classpath in Cloudera Manager. The spark class path can also be configured through Cloudera Manager under the spark configuration / Worker Environment Advanced Configuration Snippet. See Fig 12.2. If it isn’t already set, add:
SPARK_CLASSPATH="/usr/lib/trustedanalytics/graphbuilder/lib/ispark-deps.jar"

Fig. 12.2 Spark Class Path
End of manual configuration
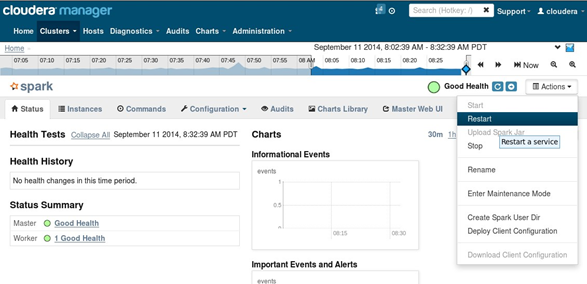
Restart the Spark service. See Fig. 13.3.

Fig. 13.3 Restart Spark
Database Configuration
The Trusted Analytics Platform service can use two different databases H2 and PostgreSQL. The configuration script configures postgresql automatically.
H2
Caution
H2 will lose all metadata upon service restart.
Enabling H2 is very easy and only requires some changes to application.conf. To comment a line in the configuration file either prepend the line with two forward slashes ‘//’ or a pound sign ‘#’.
The following lines need to be commented:
Before:
metastore.connection-postgresql.host = "invalid-postgresql-host"
metastore.connection-postgresql.port = 5432
metastore.connection-postgresql.database = "ta-metastore"
metastore.connection-postgresql.username = "atkuser"
metastore.connection-postgresql.password = "myPassword"
metastore.connection-postgresql.url = "jdbc:postgresql://"${trustedanalytics.atk.metastore.connection-postgresql.host}":"${trustedanalytics.atk.metastore.connection-postgresql.port}"/"${trustedanalytics.atk.metastore.connection-postgresql.database}
metastore.connection = ${trustedanalytics.atk.metastore.connection-postgresql}
After:
//metastore.connection-postgresql.host = "invalid-postgresql-host"
//metastore.connection-postgresql.port = 5432
//metastore.connection-postgresql.database = "ta-metastore"
//metastore.connection-postgresql.username = "atkuser"
//metastore.connection-postgresql.password = "myPassword"
//metastore.connection-postgresql.url = "jdbc:postgresql://"${trustedanalytics.atk.metastore.connection-postgresql.host}":"${trustedanalytics.atk.metastore.connection-postgresql.port}"/"${trustedanalytics.atk.metastore.connection-postgresql.database}
//metastore.connection = ${trustedanalytics.atk.metastore.connection-postgresql}
Next, uncomment the following line:
Before:
//metastore.connection = ${trustedanalytics.atk.metastore.connection-h2}
After:
metastore.connection = ${trustedanalytics.atk.metastore.connection-h2}
PostgreSQL
PostgreSQL configuration is more involved than H2 configuration and should only be attempted by an advanced user. Using PostgreSQL allows graphs and frames to persist across service restarts.
First, log into the postgres user on the linux system:
$ sudo su postgres
Start the postgres command line client:
$ psql
Wait for the command line prompt to come:
postgres=#
Then create a user:
postgres=# create user YOURUSER with createdb encrypted password 'YOUR_PASSWORD';
User creation confirmation:
CREATE ROLE
Then create a database for that user:
postgres=# create database YOURDATABASE with owner YOURUSER;
Database creation confirmation:
CREATE DATABASE
After creating the database exit the postgres command line by hitting
ctrl + d
Once the database and user are created, open ‘/var/lib/pgsql/data/pg_hba.conf’
and add this line
host all YOURUSER 127.0.0.1/32 md5
to very the top of the file:
$ vi /var/lib/pgsql/data/pg_hba.conf
Add the new line at the very top of the file or before any uncommented lines. If the pg_hba.conf file doesn’t exist, initialize postgresql with:
$ sudo survice postgresql initdb
Now that the database is created, uncomment all the postgres lines in
application.conf.
Before:
//metastore.connection-postgresql.host = "invalid-postgresql-host"
//metastore.connection-postgresql.port = 5432
//metastore.connection-postgresql.database = "ta-metastore"
//metastore.connection-postgresql.username = "atkuser"
//metastore.connection-postgresql.password = "myPassword"
//metastore.connection-postgresql.url = "jdbc:postgresql://"${trustedanalytics.atk.metastore.connection-postgresql.host}":"${trustedanalytics.atk.metastore.connection-postgresql.port}"/"${trustedanalytics.atk.metastore.connection-postgresql.database}
//metastore.connection = ${trustedanalytics.atk.metastore.connection-postgresql}
After:
metastore.connection-postgresql.host = "localhost"
metastore.connection-postgresql.port = 5432
metastore.connection-postgresql.database = "YOURDATABASE"
metastore.connection-postgresql.username = "YOURUSER"
metastore.connection-postgresql.password = "YOUR_PASSWORD"
metastore.connection-postgresql.url = "jdbc:postgresql://"${trustedanalytics.atk.metastore.connection-postgresql.host}":"${trustedanalytics.atk.metastore.connection-postgresql.port}"/"${trustedanalytics.atk.metastore.connection-postgresql.database}
metastore.connection = ${trustedanalytics.atk.metastore.connection-postgresql}
Restart the Trusted Analytics Platform service:
$ sudo service trustedanalytics restart
After restarting the service, Trusted Analytics Platform will create all the database tables. Now insert a meta user to enable Python client requests.
Login to the postgres linux user:
$ sudo su postgres
Open the postgres command line:
$ psql
Switch databases:
postgres=# \c YOURDATABASE
psql (8.4.18)
You are now connected to database "YOURDATABASE".
Then insert into the users table:
postgres=# insert into users (username, api_key, created_on, modified_on) values( 'metastore', 'test_api_key_1', now(), now() );
INSERT 0 1
View the insertion by doing a select on the users table:
postgres=# select * from users;
There should only be a single row per api_key:
 user_id | username  |  api_key  |      created_on     |     modified_on
---------+-----------+-----------+---------------------+---------------------
       1 | metastore | api_key_1 | 2014-11-20 12:37:16 | 2014-11-20 12:37:16
   (1 row)
If there is more than one row for a single api key, remove one of them or create a new database. The server will not be able to validate a request from the REST client if there are duplicate api keys.
After the confirmation of the insert, commands from the python client can be sent.
Starting The Trusted Analytics Platform REST Server
Starting the REST server is very easy. It can be started like any other Linux service.
$ sudo service trustedanalytics start
After starting the REST server, browse to the host on port 9099 (<master node ip address>:9099) to see if the server started successfully.
Troubleshooting Trusted Analytics Platform REST Server
A log gets written to ‘/var/log/trustedanalytics/rest-server/output.log or ‘/var/log/trustedanalytics/rest-server/application.log’. To resolve issues starting or running jobs, tail either log to see what error is getting reported while running the task:
$ sudo tail -f /var/log/trustedanalytics/rest-server/output.log
or:
$ sudo tail -f /var/log/trustedanalytics/rest-server/application.log
Upgrading
Unless specified otherwise in the release notes, upgrading requires removal of old software prior to installation of new software.