Cloudera Hadoop 5 Configuration
Table of Contents
- Install Cloudera Manager
- Proxy and Parcel Info in Cloudera Manager
- Submit License File
- Specifying Hosts
- CDH Parcel Repository
- Java Encryption
- SSH Login Credentials
- Cluster Installation
- Host Configuration
- CDH Services to Install
- Customize Role Assignments
- Database Setup
- Review Changes
- Finishing Up In Cloudera Manager
- Final Settings and Tests
This guide discusses the process of configuring Cloudera Hadoop 5 on a physical or virtual cluster.
Install Cloudera Manager
The Cloudera Manager must be downloaded and installed. For instructions, see the Cloudera website (http://www.cloudera.com/content/support/en/downloads/cloudera_manager/cm-5-1-0.html).
Proxy and Parcel Info in Cloudera Manager
- On a web browser, go to the Cloudera Manager.
- Click the Cloudera Manager hyperlink graphic on the top left portion of the window
- Click the Administration drop-down along the top of the window, then select Settings
- Select the Network button along the menu pane to the left
- In the Proxy Server field, enter the proxy qualified name, for example,
proxy.my.company.com - In the Proxy Port field, enter the proxy port number
- Select the Parcels button along the menu pane to the left
- Overwrite the field that says
http://archive.cloudera.com/cdh5/parcels/latest/withhttp//archive.cloudera.com/cdh5/parcels/5.3.1/
- Overwrite the field that says
- Hit the Save Changes button to the top right of the active menu
- Hit the admin drop-down menu at the top right corner of the window and logout
- Log back in using the same admin username password combo
Submit License File
- Acquire the Cloudera license file.
- Under the Cloudera Enterprise column, click on the empty text field to the left of the Upload button
- Select the license file
- Hit the Upload button
- Hit Continue on the bottom right of the window
Specifying Hosts
This step connects the master node to the rest of the cluster.
The syntax used to search for hostnames is identical to what can be found in
the /etc/hosts file or by DNS lookup.
Hit Continue through the “Thank you for choosing Cloudera Manager and CDH” window. In the text field presented, enter the hostnames of each node in the following syntax:
master.clustername.cluster
node[01-03].clustername.cluster
Where clustername is the name of the cluster, and [01-03] is the range
of slave nodes in the cluster ([01-07] for an 8 node cluster,
[01-15] for a 16 node cluster).
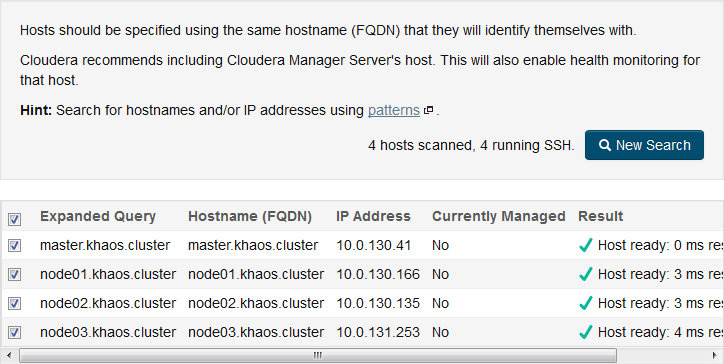
Hit Search, and make sure that the computer detects as many hosts as there are nodes in the cluster. See Fig. 11.1 for examples. If all correct hosts are selected, hit Continue. Otherwise, click New Search.
CDH Parcel Repository
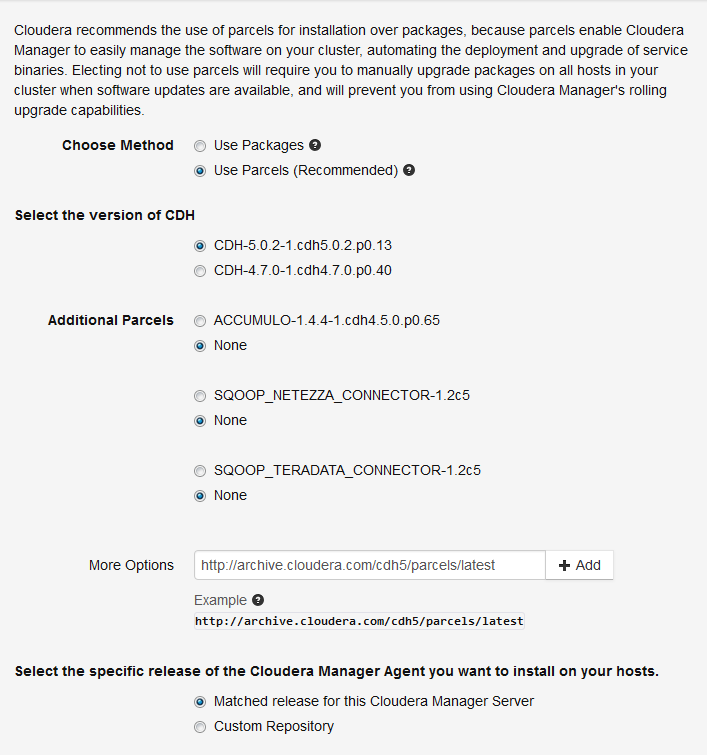
The repository/proxy information should populate the parcel list in a minute.
If not, click on More Options field to reconfigure.
Make sure CDH-5.3.1-1.cdh5.3.1.p).3 is selected under Remote Parcel
Repository (see Fig. 11.2) and then hit
Continue.
Java Encryption
Java encryption is not currently supported.
SSH Login Credentials
Fill out appropriate login information for CDH administrator user.
Cluster Installation
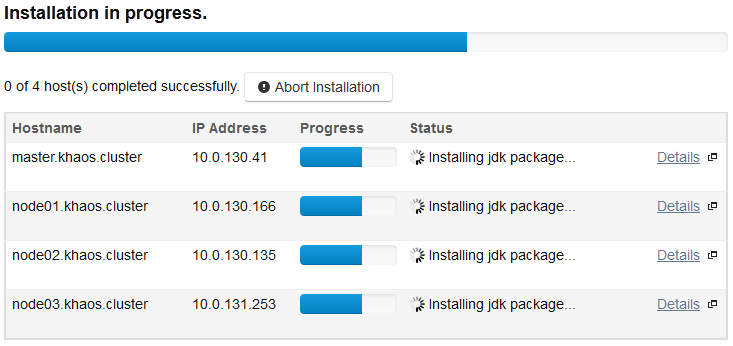
The next couple of windows are just progress bars. If any of them fail and turn red, sometimes just hitting Retry will fix the problem nodes. See Fig 11.3.
Hit Continue button when it lights up after the progress bar fills. You will be greeted by more progress bars. Wait and hit Continue when they finish too.
Host Configuration
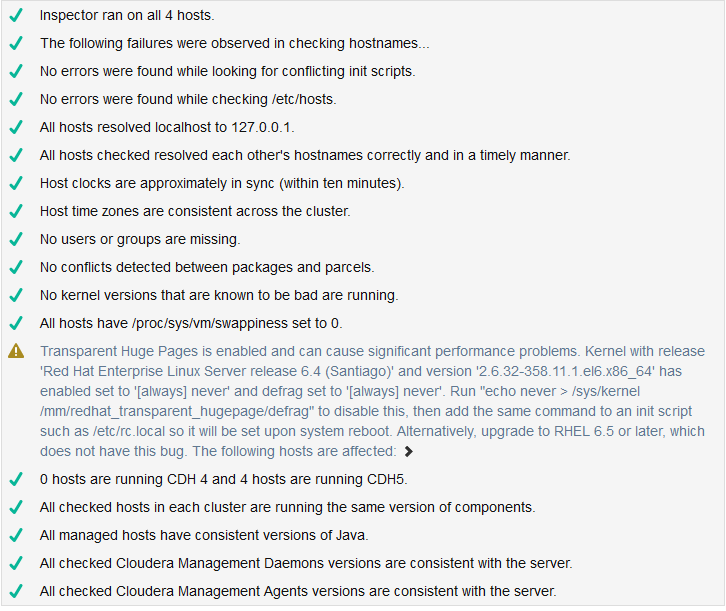
When the cluster installation finishes, look for any critical errors. Take note of anything that doesn’t have a green check mark next to it and resolve the issue. See Fig. 11.4.
Click Finish
CDH Services to Install
Choose the CDH 5 services to install on your cluster. The following windows will show the process of installing services and roles on each node in the cluster. This is the Trusted Analytics Platform default setup.
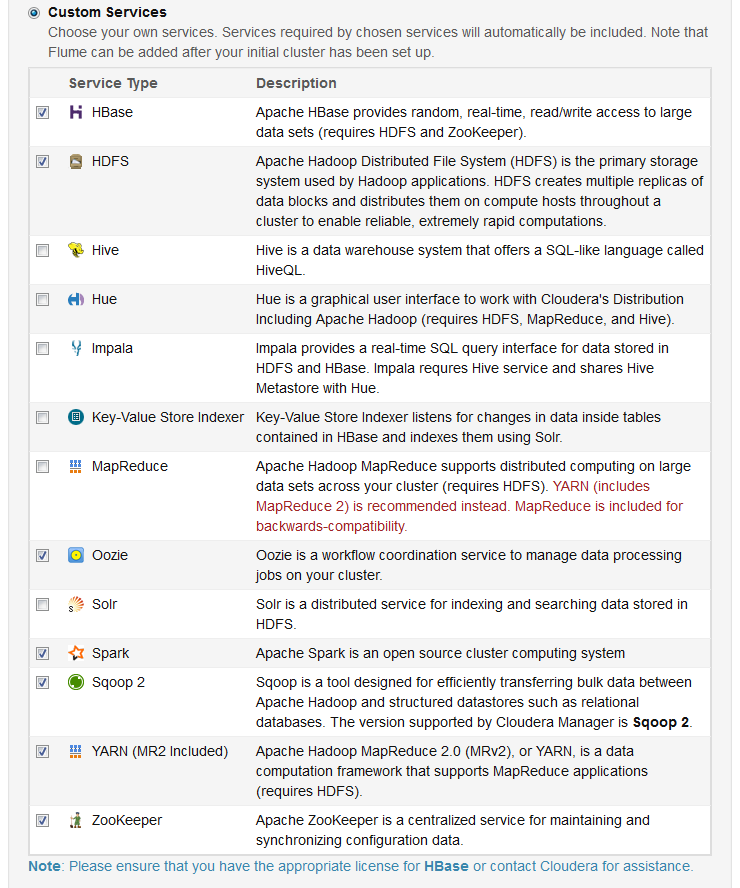
In the “Choose a combination of services to install” dialogue, select the “Custom Services” button. In the drop-down menu, mark the following boxes:
- HBase
- HDFS
- Spark
- YARN (MR2 Included)
- ZooKeeper
See Fig. 11.5. Click Continue.
Customize Role Assignments
This page allows designation of which roles the different nodes will take up. In a default loadout, almost all of these fields will be left to their default, but there are four that need to be changed.
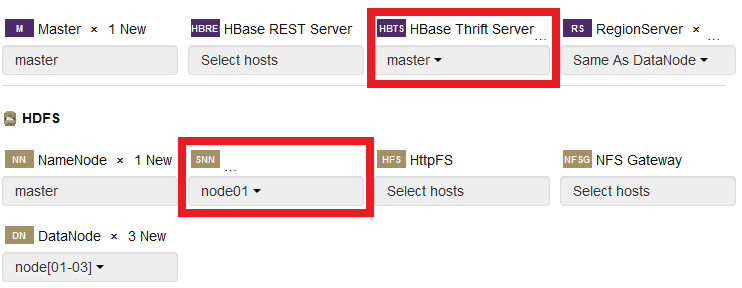
- Under the HBase section, click on the HBase Thrift Server dialogue and select the “master” node of the cluster
- Under the HDFS section, click on the Secondary Name Node dialogue and select “node01” of the cluster
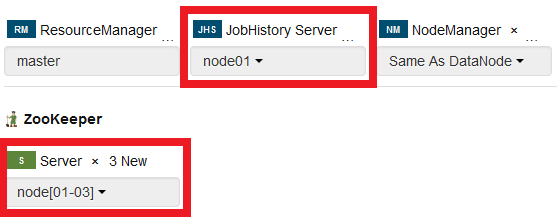
- Under the YARN section, click on the Job History Server dialogue and select “node01” of the cluster
- Under the ZooKeeper section, click on the Server dialogue and select “node01”, “node02” and “node03” of the cluster
Leave all other fields in their default values and click Continue.
See Fig. 11.6 for changes to make near the top:
See Fig. 11.7 for changes to make near the bottom:
Database Setup
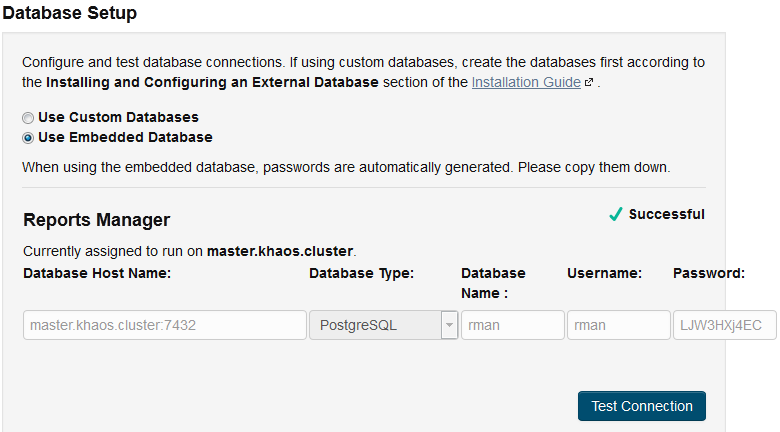
The “Database Host Name” field should auto-populate with the hostname of the system on which Cloudera Manager is installed. If not, fill that in.
Click Test Connection. See Fig 11.8. If successful, click Continue.
Review Changes
In the “Review Changes” window, all fields should remain their default values.
Click Continue.
Finishing Up In Cloudera Manager
The next page requires no interaction. Just more loading bars.
- Wait for all services to start up, then hit Continue.
- In the Congratulations! window, click Finish.
- Some of the health indicators may be orange or red in the first few moments of the cluster’s life. Wait a minute for them to all turn green.
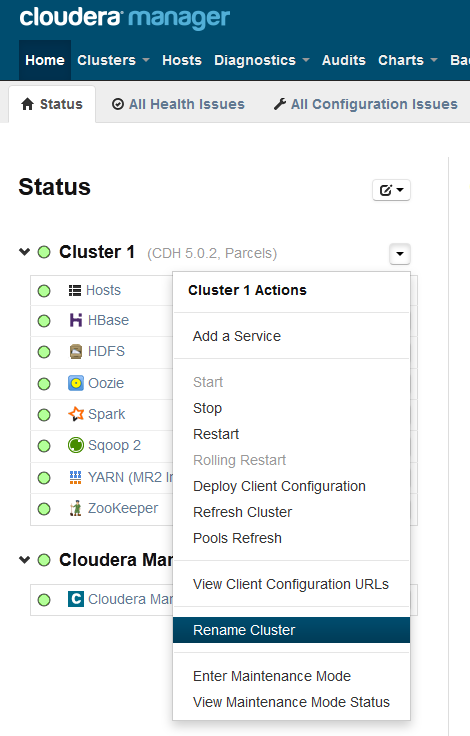
- In the Cloudera Manager page, change the name of the cluster by hitting the drop down arrow to the right of the Cluster 1 heading then clicking Rename Cluster. See Fig. 11.9.
- In the Cloudera Manager, hit the admin drop-down at the top right corner of the screen and select Change Password. Change the password as desired.
- Select the Spark service from the homescreen.
- Select Configuration along the top Spark menu.
- Select Worker Default Group along the left side menu pane.
- Select the Work Directory field and change the value to a directory with the capacity to store lots of temporaty data (the /mnt directory for virtual clusers).
Final Settings and Tests
Test functionality of HDFS.
