Configuration
In this section you will learn how to configure your PEER instance. As any Django project all configuration options are stored in a settings.py file, which is located inside the main PEER directory.
However it is not recommended to change the settings.py file directly since that would make upgrades more difficult for you. You should see this file as the file with the default configuration settings. You should put your own settings in a file called local_settings.py. The options you put there will override the same options located in the settings.py file.
First we will cover the options that you must change in order to run the PEER instance correctly. Then we will see other optional settings that you may want to change but that are ok with their default values. At the end of this section you will see local_settings.py example.
If you change any setting you must restart your web server in order to see your new settings applied.
Settings you should change
Database settings
Here you tell PEER the necessary information to connect to your database. The default values will not probably fit your case:
DATABASES = {
    'default': {
        'ENGINE': 'django.db.backends.postgresql_psycopg2',
        'NAME': 'peer',
        'USER': 'peer',
        'PASSWORD': 'peer',
        'HOST': '',
        'PORT': '',
    }
}
This option is pretty much self explanatory. Check the Django documentation to learn all the details about this setting.
The Site object
Django uses a Site model to store information about the domain your project is running at. This is used when composing links that are not shown in the web application itself, such as links in the emails that are sent.
So you need to log in as the administrator user and go to the Django admin interface to edit the only Site object you should have:
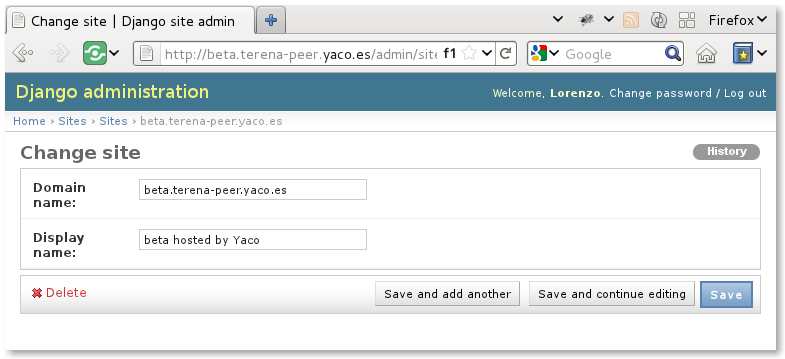
It is very important to enter the correct Domain name so users will be able to complete the registration process by clicking in correct links in their inboxes.
Note
The id of your Site object should match the value of the SITE_ID setting. You shouldn’t need to do anything special here since this is the default behaviour.
Mail settings
The PEER instance needs to send email in order to correctly perform several actions such as sending registration activation links or warning users when their metadata is about to expire.
The DEFAULT_FROM_EMAIL settings is used as the From header in all these emails:
DEFAULT_FROM_EMAIL = 'no-reply@example.com'
You will probably want to change this email address to fit the subdomain where you installed the PEER instance.
The next settings define where is your SMTP server and how to connect to it:
EMAIL_HOST = 'smtp.example.com'
EMAIL_PORT = 25
Note
You can check Django settings reference if your SMTP server require authentication.
Recaptcha keys and the Django SECRET_KEY
PEER uses the Recaptcha service to prevent spammers to register into your PEER instance. In order to use such service you should register your PEER site into Recaptcha and they will give you a public and a private key. You have to write these keys in your local_settings.py file:
RECAPTCHA_PUBLIC_KEY = ''
RECAPTCHA_PRIVATE_KEY = ''
As you can see the default values for these options are empty so you must not skip this step if you want the user registration to operate correctly.
Django uses another key for some features. This key is called the SECRET_KEY and should be unique. When a new Django project is created the django-admin.py program will create such a key for you but the PEER project is already cloned so you will need to create it yourself. One way to create such a key is executing the following command:
python -c "from random import choice; print ''.join([choice('abcdefghijklmnopqrstuvwxyz0123456789\!@#$%^&*(-_=+)') for i in range(50)])"
And now paste it into the SECRET_KEY option:
SECRET_KEY = ''
As before, the default value of the SECRET_KEY is empty for security reasons.
MEDIA_ROOT setting
This settings specifies a directory where user files will be stored. In PEER, this directory contains the main metadata repository, usually stored as a GIT repository.
MEDIA_ROOT = os.path.join(BASEDIR, 'media')
By default the MEDIA_ROOT root lives inside the PEER main directory which is not what you usually want. You really want to put this directory outside your PEER main directory in order to prevent data lost when upgrading the PEER software. Actually the upgrade process does not lost any data but as the new version is installed into another directory you will need to move the media root or change the MEDIA_ROOT setting anytime you upgrade PEER.
Also, remember that the user that your web server is run as needs to have write access to the MEDIA_ROOT directory.
Version control for SAML metadata documents
In this system, endpoints are represented by SAML documents, that are kept under version control by GIT. Some other VCS might be used; this is controlled by the setting:
VFF_BACKEND = 'vff.git_backend.GitBackend'
This setting is required, and, at the moment, there is only one VCS backend, the GIT backend, so this setting must be set exactly as shown.
The git backend can be configured by 2 additional settings, both of which are optional. With VFF_REPO_ROOT you point to the git repo that will keep the documents. This repo can exist previously, otherwise it will be initialized on first access. If this setting is not provided, the system will default to os.path.join(settings.MEDIA_ROOT, 'vf_repo:
VFF_REPO_ROOT = '/path/to/my/repo'
With VFF_REPO_PATH, you can specify a relative path within the repository. This may be useful if you use a repository that was in use before for other purposes, and want to keep metadata files separated from other content. If unset, it will default to no subpath:
VFF_REPO_PATH = 'my/subpath'
Terms of use texts
PEER asks the user to accept some terms of use in two situations:
- When the user is registered in the site.
- When the user import metadata from his computer or a remote location.
In both cases a legal text should be presented to the user in order to prevent future complications. These text must be stored in UTF-8 encoded text files and you will configure their locations with a couple of settings:
USER_REGISTER_TERMS_OF_USE = os.path.join(BASEDIR, 'user_register_terms_of_use.txt')
METADATA_IMPORT_TERMS_OF_USE = os.path.join(BASEDIR, 'metadata_import_terms_of_use.txt')
The default values reference a couple of files located inside the PEER main directory. The content of these files is not very useful skeaking about legal terms, so you should contact your lawyers and create your own files. As with the MEDIA_ROOT setting, it is recommended to place these files outside the PEER main directory to make upgrades easier.
Settings you may change
Theme
PEER look can be customizable by changing the PEER_THEME setting:
PEER_THEME = {
    'LINK_COLOR': '#5669CE',
    'LINK_HOVER': '#1631BC',
    'HEADING_COLOR': '#1631BC',
    'INDEX_HEADING_COLOR': '#ff7b33',
    'HEADER_BACKGROUND': '',
    'CONTENT_BACKGROUND': '',
    'FOOTER_BACKGROUND': '',
    'HOME_TITLE': 'Nice to meet you!!',
    'HOME_SUBTITLE': 'Say hello to federated worldwide services',
    'JQUERY_UI_THEME': 'default-theme',
}
Each element of this dictionary has its own purpose:
- LINK_COLOR
- Foreground color for the links.
- LINK_HOVER
- Foreground color for he links when the mouse cursor is over hem.
- HEADING_COLOR:
- Foreground color for the heading section.
- INDEX_HEADING_COLOR:
- Foreground color for the heading section of the index page (homepage).
- HEADER_BACKGROUND:
- Background color for the header section.
- CONTENT_BACKGROUND:
- Background color for the content section.
- HOME_TITLE:
- Text that will be shown in the main banner of the homepage.
- HOME_SUBTITLE:
- Secondary text that will be shown in the main banner of the homepage.
- JQUERY_UI_THEME:
- jQuery UI theme to use. You can generate these themes using the Theme Roller application. Then you should put this theme inside the css directory. This theme should be for jQuery UI 1.8.14 version. This theme will affect the look of every button, icon, user messages and other widgets accross the whole site.
Check the Branding customization guidelines section for more information about how to create a coherent theme.
Registration settings
These settings affect the user registration process. Right one only one setting exists:
ACCOUNT_ACTIVATION_DAYS = 2
This is the number of days the activation key can be used. After this period, the user will need to register again.
Metadata Validation
The METADATA_VALIDATORS settings specifies the validators that will be used in the validation process that happens every time an entity’s metadata is changed. It is a list of strings, each string representing the full path of a python function, that is the validator:
METADATA_VALIDATORS = (
    'peer.entity.validation.validate_xml_syntax',
    'peer.entity.validation.validate_domain_in_endpoints',
    'peer.entity.validation.validate_metadata_permissions',
)
In order to save the changes of an entity’s metadata all the validators must succeeded.
A validator is just a single python function with the following interface:
- It receives two arguments: the entity object and an XML string representing the metadata.
- It returns a list of error messages or an empty list if the XML string is valid.
Check the provided validators for examples about how to write your own validators.
Metadata Permissions
The METADATA_PERMISSIONS settings specified the SAML metadata elements whose permissions can be managed. The permissions for each element are for adding, deleting and modifying the element. Any XPATH not specified in the settings file will by default will give permission any user to do anything. The format of each element of the settings is:
MEATADATA_PERMISSIONS = (
     ('XPATH', 'permission_name', 'Permission Description')
)
In a concrete example:
METADATA_PERMISSIONS = (
    ('.//md:ServiceDescription', 'service_descriptor', 'Service Description'),
    ('.//mdui:Description', 'description', 'Description'),
    ('.//md:OrganizationName', 'organization_name', 'Organization Name'),
)
Once the pemissions are specified a special migration is needed:
$ django-admin.py migrate --all; django-admin.py syncdb --all
In order to manage permissions for a given user, you need to login as superuser in the Django admin interface, browse to Users and pick the user whose permissions you want to change (by default, once a permission is added to the settings, a normal user won’t be able to do anything in the attribute specified in the settings). In User permissions there is a panel with the permissions that are available. For each element specified in the settings the permissions for adding, deleting and modifying should be present in the panel*; i.e.: permissions Can add <Permission Description>, Can edit <Permission Description> and Can delete <Permission Description>. To give the user a permission, pick the permission and move it to Chosen user permissions.
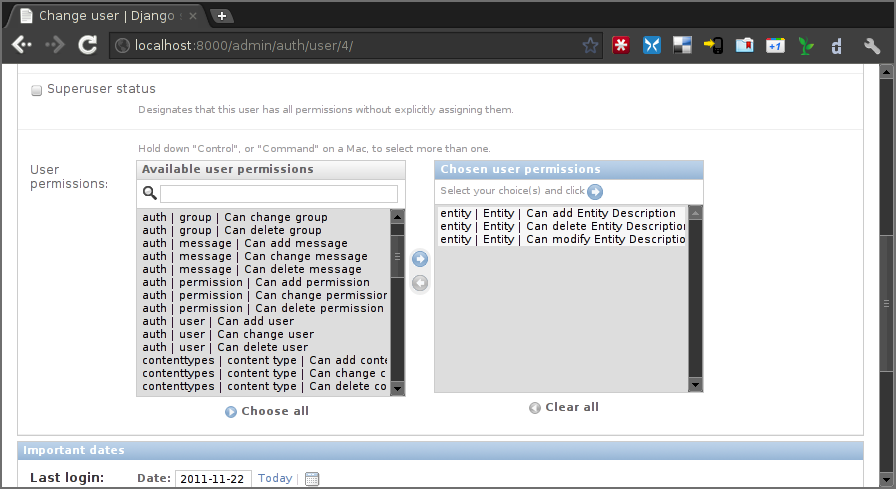
Any SAML metadata element not present in the settings has its permissions enabled by default. Once it’s added a normal user won’t be able to add, modify or delete any SAML medata element unless is not present in the settings and a superuser has granted the user with the permissions.
Note
As of version 0.7.0 of PEER, only the XPATH subset supported by the XPATH ElementTree API can be used. This means that selectors by element value, for example, are not supported.
SAMLmetaJS plugins
SAMLmetaJS is a jQuery plugin that turns a simple HTML textarea element into a full blown SAML metadata editor. It has a small core and several plugins for editing specific parts of the metadata XML.
With this setting you can set which plugins are going to be active and in which order. This will affect the tabs that appear in the metadata edition view.
SAML_META_JS_PLUGINS = ('info', 'org', 'contact', 'saml2sp', 'certs',
                        'attributes')
Check the SAMLmetaJS website for a complete list of all available plugins.
Pagination and feeds settings
With these settings you can control the number of entities that are shown in certain circunstances.
The MAX_FEED_ENTRIES setting controls the number of entities that are returned in the global rss feed.
MAX_FEED_ENTRIES = 10
If you do not define this setting the global rss feed will return the full set of entities. Be careful if you have a lot of entities since this can be degradate performance.
The ENTITIES_PER_PAGE setting controls the number of entities that are displayed in each page of the full list view and the search results view.
ENTITIES_PER_PAGE = 10
Expiration warning
The EXPIRATION_WARNING_TIMEDELTA setting specifies the time threshold that should be used to determine if a warning email should be sent when the metadata of an entity is about to expire. If the time when the metadata is expired minus the EXPIRATION_WARNING_TIMEDELTA is greater than the current time, a warning email is sent to the entity’s team. For example, if the metadata expires the 17th of September of 2011 at 16:00 and the EXPIRATION_WARNING_TIMEDELTA is set to 5 hours, that day at 11:00 a warning email will be sent.
The value of this settings should be a datetime.timedelta object. Check the Python documentation for valid units for this object.
EXPIRATION_WARNING_TIMEDELTA = datetime.timedelta(days=1)
This feature requires that you setup a cron job that calls the expirationwarnings PEER command. Something like this should work:
0 * * * * /var/www/peer/bin/django-admin.py expirationwarnings --settings=peer.settings
Metadata refresh
In order for the users to use the metarefresh option in Entity management, this cron job needs to be setup:
* * * * * /var/www/peer/bin/django-admin.py checkmetarefresh --settings=peer.settings
This command looks for the entities that need to be refreshed and triggers the update.
Domain Ownership Proof
Currently only a mechanism to prove the ownership of a domain is implemented: sending a specific HTTP request to a host on that domain. Other mechanism are expected to appear in future releases.
Some web servers are configured to ban any request from an user agent that they don’t recognize. That is the reason there is a setting where you can set a custom User Agent header to trick your web server into thinking this requests does not come from a malicious bot.
DOP_USER_AGENT = 'Mozilla/5.0 (X11; Linux i686; rv:10.0.1) Gecko/20100101 Firefox/10.0.1'
This option is not set by default, which means the default user agent that is used is specified in Python standard library. This happens to be Python-urllib/2.6
Nagios Integration
There is a config option to allow send events to nagios vía NSCA (nagios agent) when a Entity is modified, createad or deleted.
Nagios hosts and services must be set to allow notifications for service peer and server entitydomain.fqdn as configured in settings.
This a simple example service/hosts nagios config to allow NSCA:
;; Passive service template definition
define service{
    name                    passive-service
    use                     generic-service
    check_freshness         1
    passive_checks_enabled  1
    active_checks_enabled   0
    is_volatile             0
    flap_detection_enabled  0
    notification_options    w,u,c,s
    freshness_threshold     57600     ;12hr
    check_command           check_dummy!3!"No Data Received"
}

define host{
    use             generic-host
    host_name       entitydomain.fqdn
    alias           testing peer domain
    address         192.168.1.122
    contact_groups  admins
}

define service{
    use                 passive-service
    host_name           entitydomain.fqdn
    service_description peer
    contact_groups      admins
}
You must setup your nsca.conf on nagios server and send_nsca.conf on nagios agent host.
service_description must be set as NSCA_SERVICE settings value host_name is the same that domain field on Entity objects
Remeber that nsca agent must be installed on peer server.
To enable nagios notification from django peer application you must set the correct properties on settings:
# Entities modificated nagios notification command (watch man send_nsca)
# Disabled if None
# NSCA_COMMAND = None
NSCA_COMMAND = '/usr/sbin/send_nsca -H nagios.fqdn'

# Nagios accept 0, 1, 2, 3 as 0=OK, 1=WARNING, 2=CRITICAL, 3=UNKNOWN
NSCA_NOTIFICATION_LEVEL = 3

# Nagios service name
NSCA_SERVICE = 'peer'
Administrators
The last setting you may want to change is the ADMINS setting. You put here the names and emails of the administrator stuff that will run the PEER site.
This is useful because some times emails are sent automatically to these people, for example, when a crash happens.
ADMINS = (
    # ('Your Name', 'your_email@example.com'),
)
Note
This people will not get PEER user accounts automatically. You should create them as any other user.
Example local_settings.py file
You can use this fragment as an skeleton file to get you started but remember that some settings need unique values you must provide yourself.
DATABASES = {
    'default': {
        'ENGINE': 'django.db.backends.postgresql_psycopg2',
        'NAME': 'peer',
        'USER': 'peer',
        'PASSWORD': 'peer',
        'HOST': '',
        'PORT': '',
    }
}

DEFAULT_FROM_EMAIL = 'no-reply@example.com'
EMAIL_HOST = 'smtp.example.com'
EMAIL_PORT = 25

# do not use these keys: they are invalid
RECAPTCHA_PUBLIC_KEY = 'XXXXXXXXXXXXXXXXXXXXXXXXXXXXXXXXXXXXXXXX'
RECAPTCHA_PRIVATE_KEY = 'YYYYYYYYYYYYYYYYYYYYYYYYYYYYYYYYYYYYYYYY'

# do not use this key: create your own
SECRET_KEY = '0123456789qwertyuiopasdfghjklzxcvbnm'

MEDIA_ROOT = '/var/peer-media'

USER_REGISTER_TERMS_OF_USE = '/etc/peer/user_register_terms_of_use.txt'
METADATA_IMPORT_TERMS_OF_USE = '/etc/peer/metadata_import_terms_of_use.txt'

PEER_THEME = {
    'LINK_COLOR': '#5669CE',
    'LINK_HOVER': '#1631BC',
    'HEADING_COLOR': '#1631BC',
    'INDEX_HEADING_COLOR': '#ff7b33',
    'HEADER_BACKGROUND': '',
    'CONTENT_BACKGROUND': '',
    'FOOTER_BACKGROUND': '',
    'HOME_TITLE': 'Nice to meet you!!',
    'HOME_SUBTITLE': 'Say hello to federated worldwide services',
    'JQUERY_UI_THEME': 'default-theme',
}

METADATA_VALIDATORS = (
    'peer.entity.validation.validate_xml_syntax',
    'peer.entity.validation.validate_domain_in_endpoints',
    'peer.entity.validation.validate_domain_in_entityid',
)


METADATA_PERMISSIONS = (
    ('.//md:ServiceDescription', 'service_descriptor', 'Service Description'),
    ('.//mdui:Description', 'description', 'Description'),
    ('.//md:OrganizationName', 'organization_name', 'Organization Name'),
)

SAML_META_JS_PLUGINS = ('info', 'org', 'contact', 'saml2sp', 'certs')

MAX_FEED_ENTRIES = 100
ENTITIES_PER_PAGE = 10

EXPIRATION_WARNING_TIMEDELTA = datetime.timedelta(hours=2)

DOP_USER_AGENT = 'Mozilla/5.0 (X11; Linux i686; rv:10.0.1) Gecko/20100101 Firefox/10.0.1'

ADMINS = (
    # ('Your Name', 'your_email@example.com'),
)

# Entities modificated nagios notification command (watch man send_nsca)
NSCA_COMMAND = '/usr/sbin/send_nsca -H nagios.fqdn'

# Nagios accept 0, 1, 2, 3 as 0=OK, 1=WARNING, 2=CRITICAL, 3=UNKNOWN
NSCA_NOTIFICATION_LEVEL = 3

# Nagios service name
NSCA_SERVICE = 'peer'