Co-citation Analysis
Co-citation analysis gained popularity in the 1970s as a technique for “mapping” scientific literatures, and for finding latent semantic relationships among technical publications.
Two papers are co-cited if they are both cited by the same, third, paper. The standard approach to co-citation analysis is to generate a sample of bibliographic records from a particular field by using certain keywords or journal names, and then build a co-citation graph describing relationships among their cited references. Thus the majority of papers that are represented as nodes in the co-citation graph are not papers that responded to the selection criteria used to build the dataset.
Before you begin, be sure to install the latest version of Tethne. Consult the Installation guide for details.
If you run into problems, don’t panic. Tethne is under active development, and there are certainly bugs to be found. Please report any problems on our GitHub issue tracker.
Getting Started
Before you start, you should choose an output folder where TethneGUI should store graphs and descriptions of your dataset.
You should also choose a dataset ID. This is a unique ID that Tethne will use to keep track of your data between workflow steps.
Initialize TethneGUI
When you first start TethneGUI, you should see a window like the one shown below. Click Select folder... to specify your output folder. A dataset ID should be automatically generated for you; you can change this if you wish.
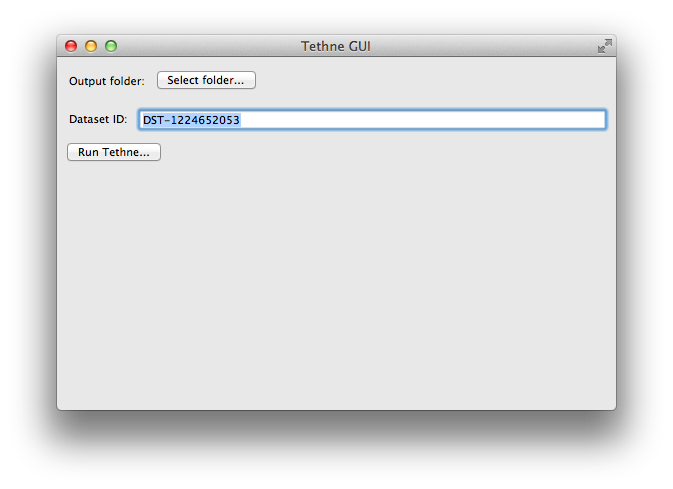
Once you’ve selected an output folder and a dataset ID, click the Run Tethne... button.
Reading WoS Data
You can read WoS data from one or multiple field-tagged data files.
Command-line
Use -I examplID to specify your dataset ID, and -O /Users/erickpeirson/exampleOutput to specify your output folder.
--data-format=WOS tells Tethne that your data are in the Web of Science field-tagged format.
$ tethne -I exampleID -O /Users/erickpeirson/exampleOutput --read-file \
--data-path=/Users/erickpeirson/Downloads/tests/savedrecs4.txt --data-format=WOS
----------------------------------------
        Workflow step: Read
----------------------------------------
Reading WOS data from file /Users/erickpeirson/Downloads/tests/savedrecs4.txt...done.
Read 500 papers in 2.67462515831 seconds. Accession: 0ff65dc3-b8f7-4bdc-a714-2d2a539f10a9.
Generating a new DataCollection...done.
Saving DataCollection to /tmp/exampleID_DataCollection.pickle...done.
TethneGUI
- Select your WoS data file. If you have one data file, click the Select a File.... If you have multiple data files in their own folder, click Select a Folder....
- Select the WOS file format.
- Click the Read files button.
Depending on the size of your dataset, this may take a minute or two. When TethneGUI is done reading your data, you should see messages like those depicted in the image below.
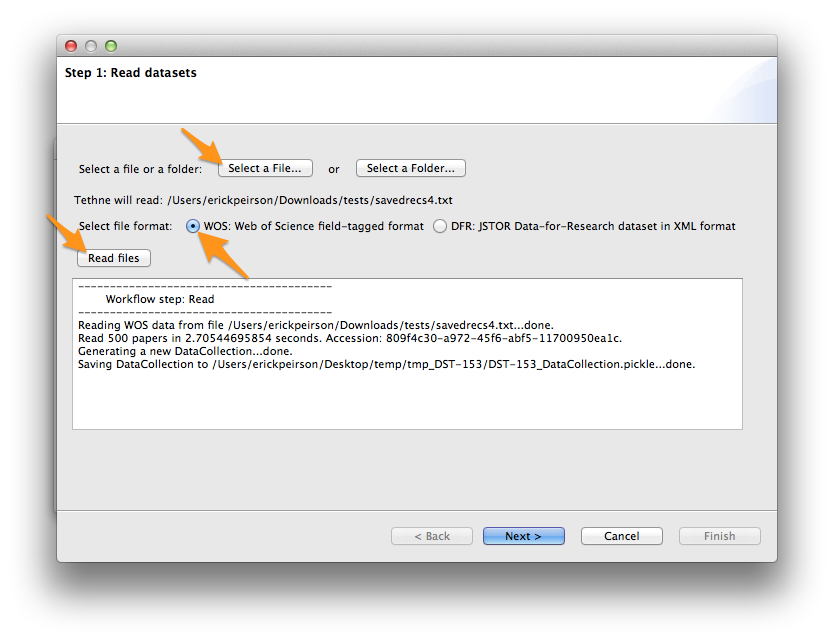
If your data are read successfully, click Next >.
Python
First import the tethne.readers module, then use the readers.wos.read() method to create a list of Paper instances. You can use readers.wos.from_dir() to import all of the WoS datafiles in a directory.
>>> # Parse data.
>>> import tethne.readers as rd
>>> papers = rd.wos.read("/Path/To/FirstDataSet.txt")
Then create a new DataCollection to organize your data.
>>> from tethne.data import DataCollection
>>> D = DataCollection(papers)
Slicing WoS Data
In this tutorial, we will build a dynamic co-citation network using a sliding time-window. Whereas time-period slicing divides data into subsets by sequential non-overlapping time periods, subsets generated by time-window slicing can overlap.

Time-period slicing, with a window-size of 4 years.
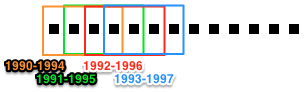
Time-window slicing, with a window-size of 4 years and a step-size of 1 year.
We use a sliding time-window for two reasons:
- To “smooth” the evolution of the network. There is lag-time between a conceptual or epistemic innovation and the publication of documents that represent that event.
- To maintain cohesion between slices.
Command-line
$ tethne -I exampleID -O /Users/erickpeirson/exampleOutput --slice -S date \
> -M time_window --window-size=2
----------------------------------------
        Workflow step: Slice
----------------------------------------
Loading DataCollection from /tmp/exampleID_DataCollection.pickle...done.
Slicing DataCollection by date...done.
Saving slice distribution to /Users/erickpeirson/exampleOutput/exampleID_sliceDistribution.csv...done.
Saving sliced DataCollection to /tmp/exampleID_DataCollection_sliced.pickle...done.
TethneGUI
- The slice axis should be set to date by default. If not, select it from the Slice axis drop-down menu.
- Set Cumulative slicing to False.
- Select time_window from the Slice method menu.
- Set the Slice window size to 2.
- Click Slice files.
After a few minutes, slicing should be complete; click Next >.
Python
Use the tethne.data.DataCollection.slice() method to slice your data.
>>> D.slice('date', 'time_window', window_size=2)