sMAP source tutorial
In this tutorial you will learn how to:
- Create a simple sMAP source from an existing driver
- Write a sMAP driver
- Manage the publication of data
Task 1: Start an existing driver
A common use case is to use an existing sMAP driver to publish data from a sensor or actuator. A list of available sMAP drivers can be found in the DriverIndex, and you can also look at the modules available in python/smap/drivers. In order to start a sMAP source using an existing driver, you first create a configuration file and then use the sMAP runtime to start the daemon.
One driver which is distributed with the distribution is the California ISO price driver. This driver scrapes price data from the the ISO’s web site, and republishes it as a sMAP feed. Drivers are implemented by python classes, so the most important thing to know is the full name of the driver in question; this one is called smap.drivers.caiso_price.CaIsoPrice.
Once you know the name of the driver, you need to create a configuration file which tells the sMAP runtime about the source you want to create. An example which uses this driver is:
[/]
uuid = fc778450-b191-11e0-bb60-0026bb56ec92
Metadata/SourceName = CA ISO price feed

[/OAKLAND]
type = smap.drivers.caiso_price.CaIsoPrice
Location = OAKLAND_1_N001
We’ve mapped in the driver under the /OAKLAND resource; all feeds provided by this driver will be underneath that resource. The Location parameter is passed to the driver, and tells it what ISO “node” to scrape. We’ll get to what uuid and Metadata/SourceName do later on.
Once you have this config file (available in python/conf/caiso_price.ini), you can run the source by typing in the python directory:
$ twistd -n smap conf/caiso_price.ini
2011-07-19 14:20:59-0700 [-] Log opened.
2011-07-19 14:21:00-0700 [-] twisted.web.server.Site starting on 8080
2011-07-19 14:21:00-0700 [-] Starting factory <twisted.web.server.Site instance at 0x901498c>
2011-07-19 14:21:00-0700 [-] get_readings DAM
And that’s it! You’re running. To consume your source, try:
$ curl http://localhost:8080/data/+ | jprint
curl is a command line tool that can easily retrieve data using http. The result of the request will be passed to jprint, a convenient tool which will pretty-print your json and is installed along with the sMAP library.
Adding Metadata
It’s often useful to tag your streams with additional information about them – sampling rate, what kind of instrument you’re using, and so on. To do this, you can include metadata in each section of your config file. In the example above, the Metadata/SourceName line is an example of this. This tag should always be set to a human-readable name which your smap source may be referred to by.
Metadata is added by “tagging” your streams. To make this easy, metadata applies to all timeseries originating below the place it is added to. Above, the Metadata/SourceName tag applies to all streams located below “/”; therefore, all streams created by the CaIsoPrice driver, in this case.
The tagging namespace is slightly structured to enable the use of some shared tags; there are three “subspaces” which you may use:
| Subspace | Contents |
|---|---|
| Metadata/Location/* | Information relating to the location of the data |
| Metadata/Instrument/* | Information about the instrument which created the data |
| Metadata/Extra/* | Arbitrary extra information |
The Location and Instrument subspaces have a pre-defined set of keys which you should use to structure your tags; see Metadata Tags.
You can place these tags directly into your configuration file:
[/OAKLAND]
type = smap.drivers.caiso_price.CaIsoPrice
Location = OAKLAND_1_N001

# add metadata to describe data
Metadata/Location/State = CA
Metadata/Location/City = Oakland
Metadata/Extra/ISONodeName = OAKLAND_1_N001
Task 2: Write a new driver
A common design pattern is to implement a “driver” for a type of instrument, and then copy that driver to represent multiple instruments of the same class. For instance, you would write one driver for the Dent electric meter, and then connect that driver to new Dent meters which are mapped into the sMAP hierarchy. To support this important case, we have provided the smap.driver module.
Conceptually, a “driver” is a piece of code which communicates with the underlying data source, and translates whatever data is available into time series with metadata. To be a driver, you need to implement two methods; the smap.driver.BaseDriver class is one example:
import time
from smap import driver, util

class BaseDriver(driver.SmapDriver):
    def setup(self, opts):
        self.add_timeseries('/sensor0', 'V')
        self.set_metadata('/sensor0', {
            'Instrument/ModelName' : 'ExampleInstrument'
            })
        self.counter = int(opts.get('StartVal', 0))

    def start(self):
        util.periodicSequentialCall(self.read).start(1)

    def read(self):
        self.add('/sensor0', time.time(), self.counter)
        self.counter += 1
As you can see, the driver uses the setup method to add a time series by naming it as the /sensor0 resource. The second argument provides engineering units. The driver also applies some metadata to this resource, and initializes its internal state (counter). The opts argument to setup is generated from the configuration file section being loaded; any options in the driver’s section of the configuration file are passed to the driver.
You’ll also notice that this driver uses the :py:function:smap.util.periodicSeqentialCall to periodically update the time series with a new value. Normally, the read method would contain code which polled the data source, interpreted the results, and then adds the data to the time series.
To start a sMAP instance which exposes only this driver, you can use a simple config file. Let’s modify the old config snippet from before:
[/]
uuid = 75503ac2-abf0-11e0-b7d6-0026bb56ec92
Metadata/SourceName = Base Example Driver

[/instrument0]
type = smap.driver.BaseDriver
Metadata/Instrument/Manufacturer = sMAP Implementer Forum
StartVal = 10
We can now run this just as easily as before using twistd.
When writing a driver, paths should be relative to a root path (“/”) and not include any other path components; the full path is created by combining the attachment point from the config file (/instrument0) with the paths supplied in the driver (/sensor0), so the full path of this sensor is /instrument0/sensor0. Paths used to create timeseries and collections inside of a driver only need to be unique within that driver, not the whole sMAP source because the keys are combined with the driver’s UUID to generate their full identifier.
Threads and Events
Twisted is an event system – everything runs in a single main loop, and nothing can block. You’re welcome to use all of the twisted library when implementing your sMAP source; just make sure nothing blocks. The typical way to interface with twisted is by registering callbacks to run in the main loop, using either twisted.internet.reactor.runFromThread(), which schedules a callback to be run in the main thread, or the twisted.internet.task.LoopingTask class which sets up a callback to be called repeatedly.
Since a common idiom in sMAP sources is to periodically poll an external device using a blocking API, we have provided the smap.util.periodicSequentialCall() function to periodically call a callback from a separate thread from the main event loop. It also guarantees that there will only be one copy of your updater running at a given time. This means you may not use any non-thread-safe twisted methods; however you may use normal blocking APIs:
from smap import util
def readValue(val):
    print "Reading value:", val
util.periodicSequentialCall(readValue, 1).start(1)
Task 3: Send data to the archiver
sMAP can send out data via HTTP POST requests to data consumers. These consumers can be configured in one of two ways. The consumer can be statically configured in the config file with a report section:
[report 0]
ReportDeliveryLocation = http://new.openbms.org/backend/add/MYAPIKEY
Any section starting with the string “report” is treated as a reporting instance. ReportDeliveryLocation specifies the URI data will be posted to.
Secondly, the consumer can be specified dynamically, through a POST request to the /reports resource on the sMAP server. An easy way to configure a new report delivery location with an existing sMAP server is to use smap-tool with the -c option.
Buffering
sMAP implementers are often interested in having their data reliably reach their consumers regardless of network failure or downtime on the consumer side. Therefore, the sMAP library contains a per-consumer buffer which tracks data which has been generated by the source but not yet delivered. By default, the reporting module will store up to 10000 values per stream in a circular buffer. This data is written back to disk, so that it can be delivered even if the sMAP server crashes or is restarted. Data is only removed from the buffer once the library receives a HTTP 200 OK, 201 CREATED, or 204 NO CONTENT responses from the destination server.
Next steps
As you move sMAP sources from development to production, you may want to:
- look through the Driver Index to see if there is a driver for your device.
- learn how to add Actuation.
- learn how to write polling Periodic scraping drivers.
- use smap-monitize to install running sources in a service manager.
- use smap-tool to configure data consumers.
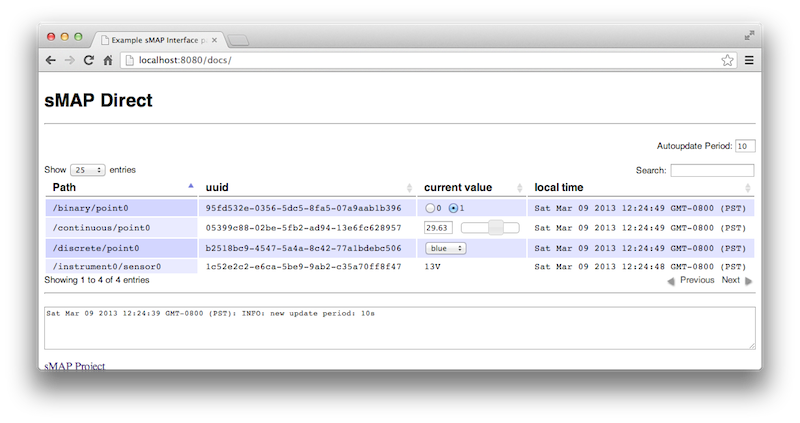
Inspecting a running server
As you could see from the output, the sMAP source starts an HTTP server on port 8080 (by default). sMAP provides several ways of inspecting this running server. First, sMAP Direct supplies a simple web-based interface to sensors and actuators accessible through the sMAP source. To access this, first start an example sMAP source:
$ twistd -n smap example.ini
...
2013-03-09 12:24:36-0800 [-] Site starting on 8080
This config file is available here and also in the source repository. Once this is running, simply visit http://localhost:8080/docs in your browser, and you should see the UI: