Headquarters
Introduction
This chapter will guide you through the process of setting up you Headquarters server. This server will keep your code documentation, servers system information, etc. Read more about the purpose here (TODO: link to prelude.rst).
This chapter is by far the trickiest one. Make yourself your favorite tea, concentrate and read slowly. The juice is worth the squeeze.
Project skeleton
We will not have Plone running on this server. However, we will still use ZopeSkel to create a skeleton of a project that will hold all configuration files, deployment scripts, etc. and remove Plone-specific stuff out of it.
Later on we’ll add HQ specific stuff such as install scripts for Munin andHudson.
Prepare Unfuddle
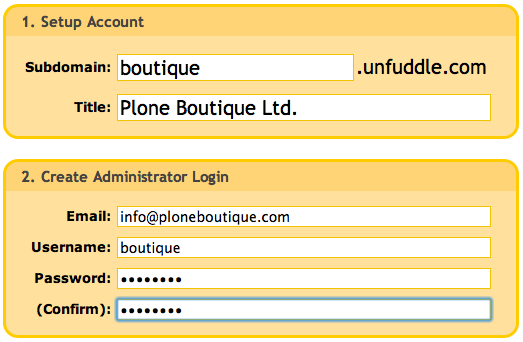
Account
If you have not already, now is the time to create an account at Unfuddle. For account id use boutique.
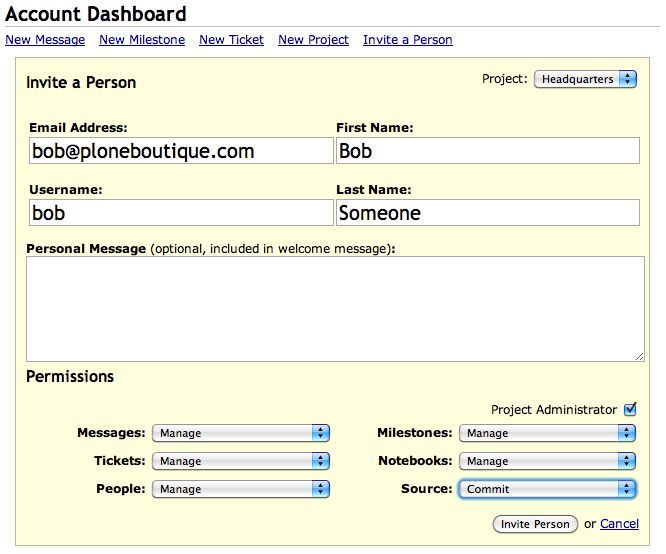
Users
Create 3 Unfuddle users, 2 for Plone Boutique developers and one for Hudson (it needs access to your code to run automated tests):
- bob
- jane
- hudson
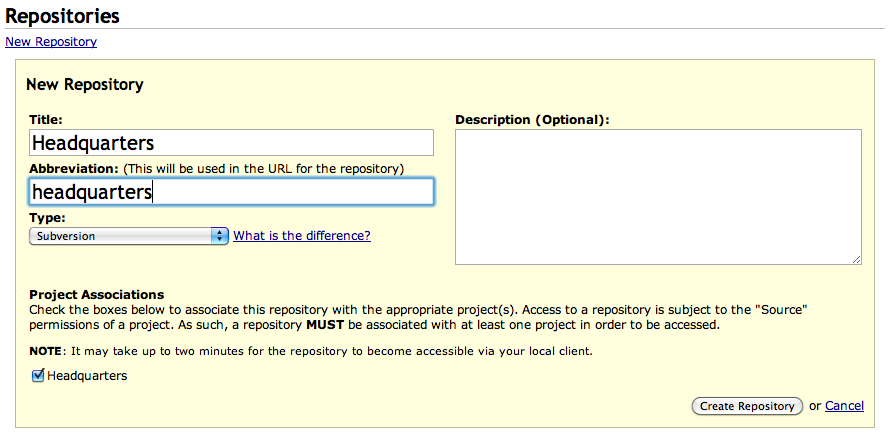
Project
Create a new project (use headquarters for project id).

Give users bob and jane read/write permissions on this project.
Give user hudson read permissions on this project.
Add a Subversion repository (use headquarters for repository id).
Prepare your new Unfuddle Subversion repository by adding base folders:
~$ svn mkdir http://boutique.unfuddle.com/svn/boutique_headquarters/{trunk,branches,tags} -m 'Added base folders'
Prepare ZopeSkel
Install/Upgrade ZopeSkel to latest version.
$ sudo easy_install -U ZopeSkel
Install/Upgrade zopeskel.niteoweb to latest version.
$ sudo easy_install -U zopeskel.niteoweb
Prepare Cloud server
If you have not already, now is the time to create an account at Rackspace Cloud (aff link).
Login to manage.rackspacecloud.com.
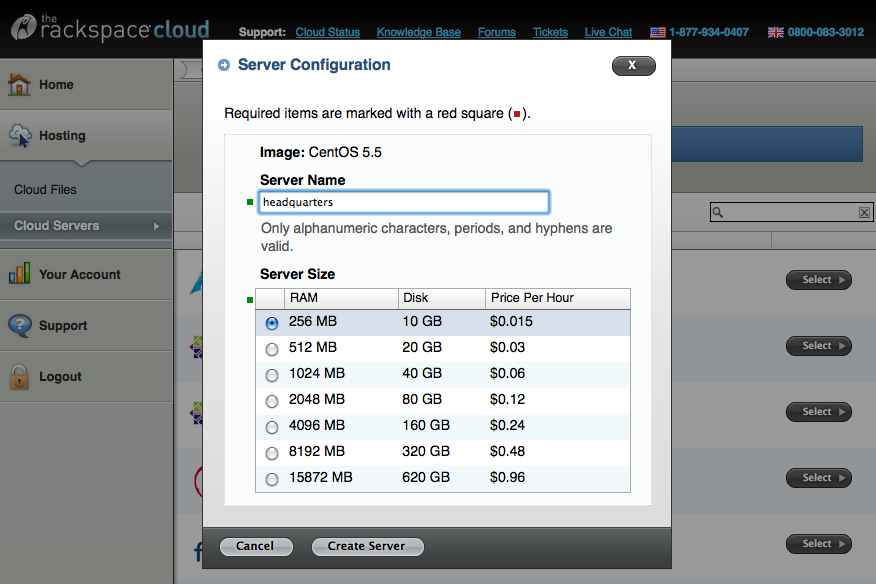
Navigate to Hosting -> Cloud Servers and click Add Server.
Select CentOS 5.5.
For Server Name enter headquarters.
For Server Size chose 265 MB.
Click Create Server.
Write down server’s IP and root password. You’ll need it for generating a project skeleton with ZopeSkel.
Prepare skeleton
Generate using ZopeSkel
Run ZopeSkel to generate a skeleton based on niteoweb_project template (the one we use for all Plone Boutique projects).
Warning
Since you don’t yet have a Headquarters server running and you are just building one at the moment, enter server’s IP for both Server IP and Headquarters IP questions.
# if you don't already have a folder for your projects, create one now
$ mkdir
$ cd ~/work

# use ZopeSkel to create a project skeleton
work$ paster create -t niteoweb_project boutique.headquarters

Expert Mode? (What question mode would you like? (easy/expert/all)?) ['easy']: easy
Description (One-line description of the project) ['Plone Boutique commercial project for eBar.si']: Configuration and install-scripts for Headquarters server
Hostname (Domain on which this project will run on.) ['ebar.si']: ploneboutique.com
IP (IP of production server. Leave default if you don't have one yet) ['87.65.43.21']: <your_server_ip>
Temporary root password (Temporary password for root user on production server. Leave default if you don't have one yet) ['root_password_here']: <root_password_from_rackspace>
Maintenance users (Usernames of administrators that will have access to your production server, separated with commas.) ['bob,jane']: bob,jane
Headquarters hostname (Domain on which your Headquarters server is running.) ['ploneboutique.com']: ploneboutique.com
Maintenance IP (IP on which your Headquarters server is listening.) ['12.34.56.78']: <your_server_ip>
Office IP (Your office IP that you use daily and can VPN to) ['12.34.56.78']: <your_office_ip>
Removing what we don’t need now
Headquarters is a special case project. Instead of a Plone site it runs several other services, like Munin and Hudson. So first things first, we need to remove everything plone-specific that we will not need.
work$ cd boutique.headquarters
boutique.headquarters$ rm coverage.cfg sphinx.cfg hudson.cfg production.cfg
boutique.headquarters$ rm -rf src/boutique/headquarters/{browser,profiles,skins,tests,config.py,configure.zcml,interfaces.py,xdv}
Customizing buildout files
Since we don’t need Plone, buildout configuration files (*.cfg’s) are much simpler.
base.cfg
In base.cfg remove the following lines/sections:
find-links
parts
eggs
zcml
[ports]
[zopepy]
development.cfg
In development.cfg remove the following lines/sections:
omelette
test
lxml
zope
eggs
zcml
[omelette]
[lxml]
[zope]
[test]
interpreter = ${buildout:directory}/bin/zopepy
Customizing nginx.conf.in
For now, we’ll just make Nginx serve static files from /home/nginx/static. More detailed configuration follows later. In boutique.headquarters/etc_templates/nginx.conf.in, replace server block starting with # Plone with the one below.
# ploneboutique.com
server {
    listen 80;
    server_name ploneboutique.com;

    location / {
        expires 1h;
        index index.html;
        root /home/nginx/static;

        # restrict access
        allow 127.0.0.1;
        allow ${config:office_ip};
        deny all;
    }
}
Commit skeleton
Ok, skeleton is ready. Commit it to Subversion and continue working on it:
# Checkout Unfuddle's Subversion repository for this project
boutique.headquarters$ svn co http://boutique.unfuddle.com/svn/boutique_headquarters/trunk ./

# Set svn:ignore, instructions how to do this are also in svnignore files
boutique.headquarters$ svn propset svn:ignore -F svnignore ./
boutique.headquarters$ svn propset svn:ignore -F docs/svnignore ./docs
boutique.headquarters$ svn propset svn:ignore -F etc/svnignore ./etc
boutique.headquarters$ svn up
boutique.headquarters$ svn ci -m "set svn:ignore"

# Commit code skeleton
boutique.headquarters$ svn add *
boutique.headquarters$ svn ci -m "added project skeleton"
Prepare deployment environment
Even though you are not using Plone on Headquarters server you can still use zc.buildout to generate server config files and install scripts for you. With development.cfg, which builds development and deployment tools, you’ll get all you need for deployment.
This is how you build the environment:
# Create symlink to development.cfg so you don't have to append '-c buildout.cfg' all the time
boutique.headquarters$ ln -s development.cfg buildout.cfg
boutique.headquarters$ svn add buildout.cfg && svn ci -m "added soft-link to development.cfg"

# Make an isolated Python environment
boutique.headquarters$ virtualenv -p python2.6 --no-site-packages ./

# Bootstrap zc.buildout
boutique.headquarters$ bin/python bootstrap.py

# Build development/deployment environment
boutique.headquarters$ bin/buildout
Important
Pin down egg versions by copying the last lines of output into versions.cfg. This makes sure that if you run this buildout in a year you will get the same versions of packages.
Basic deployment
First we need to put administrators’ public keys in ./keys folder. If you have followed instructions in chapter Toolbox, then you have all your colleagues’ keys in ~/SyncDisk/public_keys.
Each key’s filename should match that administrator’s user id. Example:
Bob has user id bob -> his public key should be copied into ./keys/bob.pub
boutique.headquarters$ cp ~/SyncDisk/public_keys/bob.pub
boutique.headquarters$ cp ~/SyncDisk/public_keys/jane.pub
Great! You are ready to do basic deployment on your new Headquarters server. Since zc.buildout generated a Fabric fabfile.py for you, this is fairly easy.
boutique.headquarters$ bin/fab deploy_base
First, Fabric will ask you Which administrator user id would you like to use to connect to the server?. Normally you would enter yourself, bob. Only use other id’s if you also have their public keys and are debugging something related to users on server.
Note
Note that Fabric will set a default password (set in base.cfg) for all administrators. Inform all of them to login to the server and change the default password to a more stronger password and keep it to themselves. Make sure that all administrators have changed their passwords before you go live with your site!
Note
You can list available Fabric commands with bin/fab --list.
You server is now up and running. Open you browser and point it to http://<server_ip>/error.html! If you see a Down for maintenance page then everything is fine.
/etc/hosts
You don’t have to use DNS yet, having IP’s mapped to hostnames in your local machine is enough for now. Adding the lines below to /etc/hosts does the trick. Note that you may have to restart your browser for changes to be applied.
boutique.headquarters$ sudo nano /etc/hosts
<server_ip> ploneboutique.com sphinx.ploneboutique.com munin.ploneboutique.com hudson.ploneboutique.com
You should be able to open http://ploneboutique.com/error.html in your browser and see a Down for maintenance page.
Headquarters services
ploneboutique.com
A simple HTML file with links to services running on this Headquarters server.
HTML/CSS
We need just one file with links. Create a new folder in static and put a new index.html inside.
boutique.headquarters$ nano src/boutique/headquarters/static/index.html
<html>
<head>
    <title>
        Services running on this Headquarters server.
    </title>
</head>
<body>
    <p>
        <ul>
            <li><a href="http://ploneboutique.com">ploneboutique.com</a> - this page</li>
            <li><a href="http://sphinx.ploneboutique.com">sphinx.ploneboutique.com</a> - Sphinx documentation for your projects</li>
            <li><a href="http://munin.ploneboutique.com">munin.ploneboutique.com</a> - Munin system information for your servers</li>
            <li><a href="http://hudson.ploneboutique.com">hudson.ploneboutique.com</a> - Automated unit tests for your projects</li>
        </ul>
    </p>
</body>
</html>
Re-upload static files to server.
boutique.headquarters$ bin/buildout
boutique.headquarters$ bin/fab reload_nginx_config
At this point you should be able to point your browser to http://ploneboutique.com/index.html and see your a page with links to Headquarters services.
hudson.ploneboutique.com
To ensure code quality we will be using continuous integration approach with hudson.
Fabric command for installing Hudson
Copy/paste these lines somewhere into your etc_templates/fabfile.py.in.
def install_hudson():
    api.sudo('yum -y install ant apr-devel openssl-devel subversion')
    api.sudo('rpm --import http://hudson-ci.org/redhat/hudson-ci.org.key')
    api.sudo('wget -O /tmp/hudson.rpm http://hudson-ci.org/latest/redhat/hudson.rpm')
    api.sudo('rpm --install --replacepkgs /tmp/hudson.rpm')

    # we limit hudson to 120MB RAM since it's a hungry thing
    sed('/etc/sysconfig/hudson',
        'HUDSON_JAVA_OPTIONS="-Djava.awt.headless=true"',
        'HUDSON_JAVA_OPTIONS="-Xss1024k -Xmn20M -Xms100M -Xmx120M -Djava.awt.headless=true"',
        use_sudo=True)
    api.sudo('chkconfig hudson on')
    api.sudo('/etc/init.d/hudson start')
Regenerate fabfile.py and run your new command:
boutique.headquarters$ bin/buildout
boutique.headquarters$ bin/fab install_hudson
Nginx server block
Below the # ploneboutique.com server block in ./etc_templates/nginx.conf.in add another block to handle requests for hudson.ploneboutique.com.
# hudson.ploneboutique.com
server {
    listen 80;
    server_name hudson.ploneboutique.com;

    location / {
        proxy_pass http://localhost:8080/;

        proxy_set_header X-Real-IP $remote_addr;
        proxy_set_header X_FORWARDED_SERVER $server_name;
        proxy_set_header X_FORWARDED_FOR $proxy_add_x_forwarded_for;
        proxy_set_header X_FORWARDED_HOST $proxy_host;
        proxy_set_header Host $http_host;

        # restrict access
        allow 127.0.0.1;
        allow ${config:office_ip};
        deny all;
    }
}
Reloading Nginx is simple, thanks to Fabric commands prepared by zc.buildout:
# re-generate nginx.conf
boutique.headquarters$ bin/buildout

# reload nginx so changes to /etc/nginx/nginx.conf take effect
boutique.headquarters$ bin/fab reload_nginx_config
At this point you should be able to point your browser to http://hudson.ploneboutique.com/.
Not done quite yet. We need to configure Hudson and install plugins.
In menu select Manage Hudson
Configure System
- Scroll down to E-mail Notifications
- SMTP server: localhost
- System Admin E-mail Address: Hudson Daemon <hudson@ploneboutique.com>
Save
Manage Hudson
Manage Plugins
- Tab “Available” and select following ones:
- Plot Plugin
- Dashboard View
- Green Balls
- Post build task
- Python plugin
Install
After plugins are installed click the Restart button
sphinx.ploneboutique.com
Sphinx documentation is already built by Hudson and placed into /home/nginx/sphinx. We just need to add a new server block to Nginx to serve these files.
Nginx server block
Below the # hudson.ploneboutique.com server block in ./etc_templates/nginx.conf.in add another block to handle requests for sphinx.ploneboutique.com.
# sphinx.ploneboutique.com
server {
    listen 80;
    server_name sphinx.ploneboutique.com;

    location / {
        expires 1h;
        autoindex on;
        root /var/www/sphinx;

        # restrict access
        allow 127.0.0.1;
        allow ${config:office_ip};
        deny all;
    }
}
And reload Nginx config.
boutique.headquarters$ bin/buildout
boutique.headquarters$ bin/fab reload_nginx_config
At this point you should be able to point your browser to http://sphinx.ploneboutique.com/ and see your projects’ documentation.
munin.ploneboutique.com
All project servers prepared with Plone Boutique have a Munin node installed. Now you need to install Munin master, that gathers information from these nodes and displays it graphically.
- Add Fabric command for installing Munin-master and run it
- Add a new server block to Nginx
Installing Munin-master
Copy/paste these lines somewhere into your etc_templates/fabfile.py.in:
def install_munin_master():
    api.sudo('yum -y install munin')
    api.sudo('chkconfig munin-node on')
Regenerate fabfile.py and run your new command.
boutique.headquarters$ bin/buildout
boutique.headquarters$ bin/fab install_munin_master
Nginx server block
Below the # sphinx.ploneboutique.com server block in ./etc_templates/nginx.conf.in add another block to handle requests for munin.ploneboutique.com.
# munin.ploneboutique.com
server {
    listen 80;
    server_name munin.ploneboutique.com;

    location / {
        index index.html;
        root /var/www/html/munin/;

        # restrict access
        allow 127.0.0.1;
        allow ${config:office_ip};
        deny all;
    }
}
And reload Nginx.
boutique.headquarters$ bin/buildout
boutique.headquarters$ bin/fab reload_nginx_config
At this point you should be able to point your browser to http://munin.ploneboutique.com/ and see your website online.
DNS settings
Finally, now that you have your server set-up and running, it’s time to set DNS settings, so your site becomes visible to the world.
First go to your domain registrar and enter the following two nameservers for you headquarters domain:
- dns1.stabletransit.com
- dns2.stabletransit.com
Go to http://manage.rackspacecloud.com -> Cloud Servers -> headquarters -> DNS tab. Under Domain Management click Add and add ploneboutique.com. Then click on a just-added domain and add a record:
- Type: A
- Name: ploneboutique.com
- Content: <server_ip>
- TTL: 86400
Save and wait for a day or so for DNS changes to propagate through the web. And this is it! Continue with the next chapter.
Note
Use command line tool dig for debugging DNS settings.
Where to now?
Alright, now you have your Toolbox ready, your Headquarters server configured and running and you are familiar with assumptions this guide takes. It’s time to continue to the last chapter, by far the easiest one, Plone project.