Welcome to squealy’s documentation!
About Squealy
Squealy is a django app for auto-generating reporting APIs. All configurations are passed through a single Yaml file, which includes sql queries to fetch report data for each API.
There is support for auto-formatting the data to google charts and highcharts format for quick dashboard integration.
Squealy also supports sql templates based on Jinjasql which uses Jinja2 under the hood, hence, complex parameterized sql queries can be written.
Squealy-generated APIs are based on Django Rest Framework. All APIs can be easily configured to use the authentication classes provided by django rest framework.
Squealy supports parameter level and API level validation/authorization as well.
Squealy also provides an authoring interface where you can connect to your local database, write/debug/validate your queries, create multiple APIs and generate a Yaml configuration for all the created APIs with a single click.
Squealy is highly customizable.
Installation and Setup Instructions
Install from pip (recommended):
pip install squealy
Install from the source:
git clone https://github.com/hashedin/squealy
cd squealy
sudo python setup.py install
Configuring the routes in your urls.py file
from squealy.apigenerator import ApiGenerator
from os.path import dirname, abspath, join

# Generate the file path to your *.yml file
YAML_ROOT = join(dirname(abspath(__file__)), "yaml")
file_path = join(YAML_ROOT, "apis.yaml")

# Generate url objects
squealy_urls = ApiGenerator.generate_urls_from_yaml(file_path)

urlpatterns = [
    url(r'^squealy/', include(squealy_urls)),
    url(r'^', include('squealy.urls')),
]
Add DRF and Squealy to your INSTALLED_APPS in settings.py
INSTALLED_APPS = [
  '<rest of the apps>',
  'squealy',
  'rest_framework',
]
Now start the local server and go to localhost:8000/squealy-authoring-interface/. What you are looking at now is the squealy authoring interface using which you can start creating your APIs. Go through the next section to read about the features this interface provides you. If you do not want to use this interface to generate the API configs in a YAML file, check out the minimalistic usage and yaml configuration with YAML section to create the API configurations yourself.
Squealy Authoring Interface
Squealy comes with an authoring interface using which you can create, test and debug multiple APIs through a single page application. Here is a detailed description of all the features:
- Support to view the response in various formats like tabular/JSON/Google Charts/Highcharts.
- Query response visualization using Google Charts charting library.
- URL name generation and customization for an API.
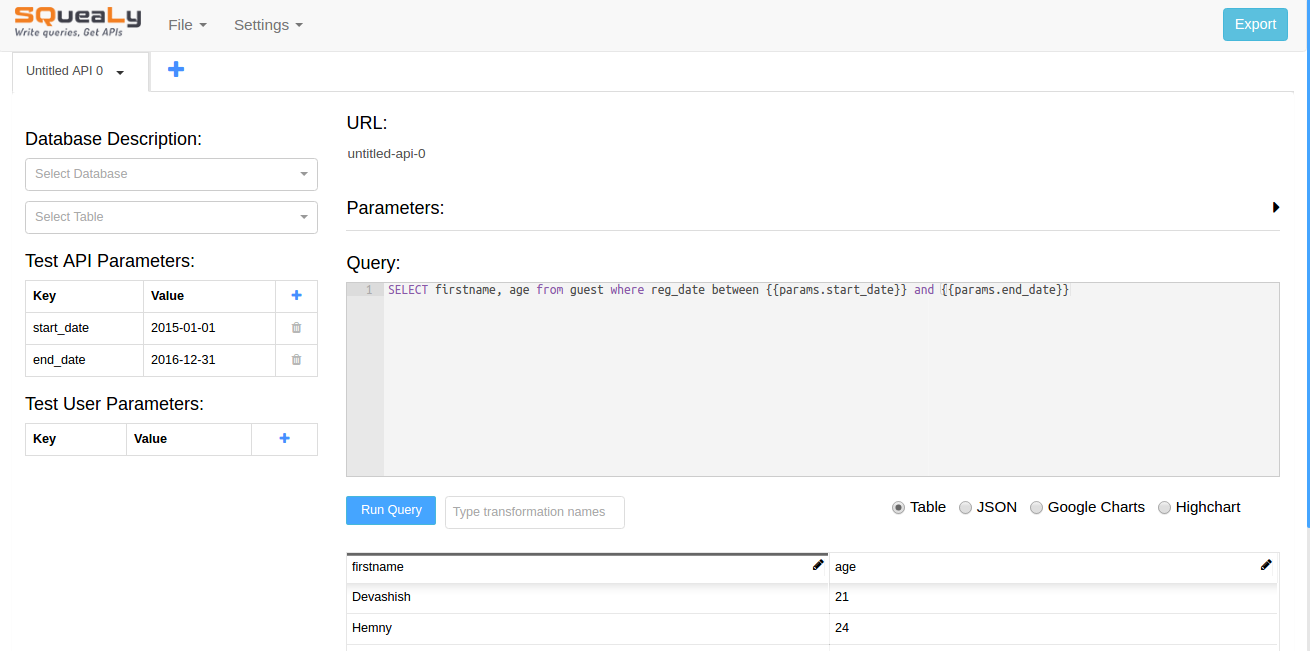
SQL Editor
We provide an editor with syntax highlighting to write the sql query. Squealy uses the ACE editor for this feature which has support for syntax highlighting and hence makes it easier to write complex queries.
Note
For each API parameter you need to append params like this - {{params.param_name}} and for any parapeter from the Django’s request.user object, you need to append user like this - {{user.prameter_name}}
Query Response Section
Just below the sql editor, we provide a section where you can view the response of the query. This response could be the data retrieved from the database or it could be a descriptive error.
Response visualization in multiple formats
Using this feature the you can view the response in multiple formats. As of now, we provide the following four formats:
- Table- Selecting this format you can view the response in a paginated table. This format can be very handy when you want to apply transformations or want to view the effects of the applied transformations.
- JSON- Selecting this format you can view the response in JSON format.
- Google Chart- This format displays the response in a structure desired by Google Chart charting library.
- Highcharts- This format displays the response in a structure desired by Highcharts charting library.
Customizing the query response
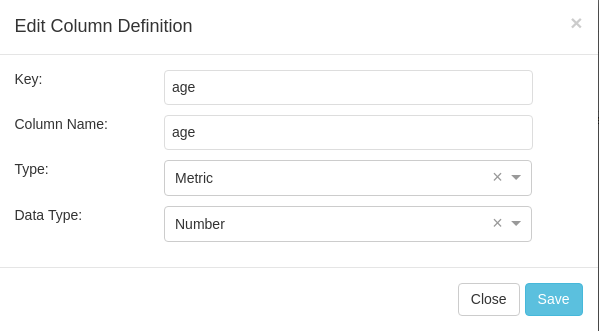
Squealy provides you the flexibility to customize the column names, type(metric/dimension) and data type(string/date/datetime/number). To use this feature, select table format from the format selection section and click on the edit icon on the column which you want to customize. This will launch a modal where you can customize the columns.
Transformations
To apply transformation, we provide a multi-select input field from where you can select a transformation and the columns on which the transformations are to be applied.
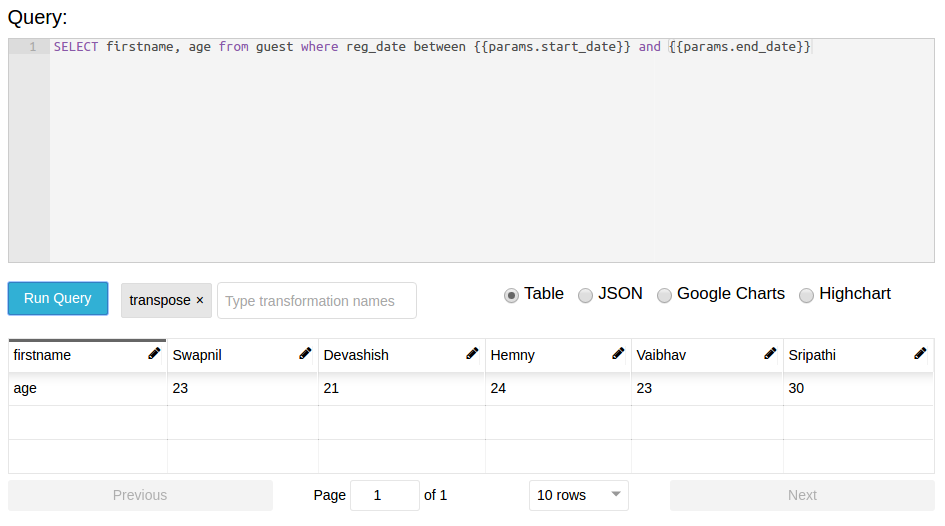
- In order to apply a transformation, select table as the response format.
- The go to the transformations dropdown and select a transformation. In case of transpose, you will not have to select a column but in split or merge that has to be done.
- In case of split, select a column to split from the modal generated and a column which is the metric in current response.
- In case of merge, just select the columns to be merged from the generated modal.
Once you are done which selecting and customizing the transformation, hit the run query button just below the SQL editor.
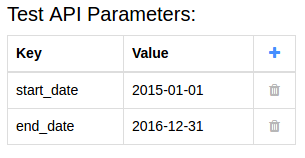
Mocking the API parameters
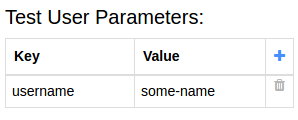
Since the queries will be having parameters which will be retrieved from the URL/session in the real world scenario, we provide a tabular section where you can insert the values for these parameters for testing purposes.
You do not have to write the parameter names as Squealy is smart enough to identify the parameters. The parameters will keep on getting added to the parameters section as you write the query.
Note
In the Test User Parameters you can put any property of Django’s request.user object.
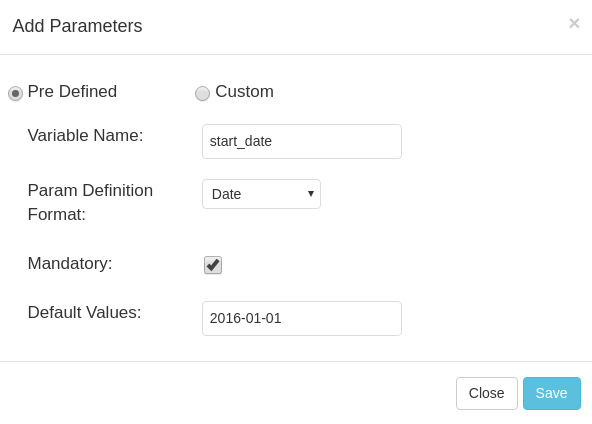
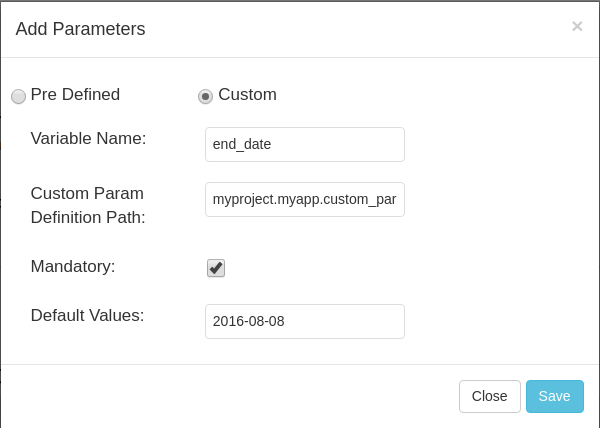
Validating the format of API parameters
There are two ways of validating the API parameter format. The first one is the pre defined way which Squealy already has. The other one is to define you custom parameter format and give the path of the function which validates the format.

Using predefined formats
Just above the SQL editor, you can define the desired format for all the parameters. The supported formats are date, datetime, number and string.
Using custom parameter formats
In the Add parameter modal enter the name of the parameter and define the path of the function which validates the parameter.
Validating the API parameters
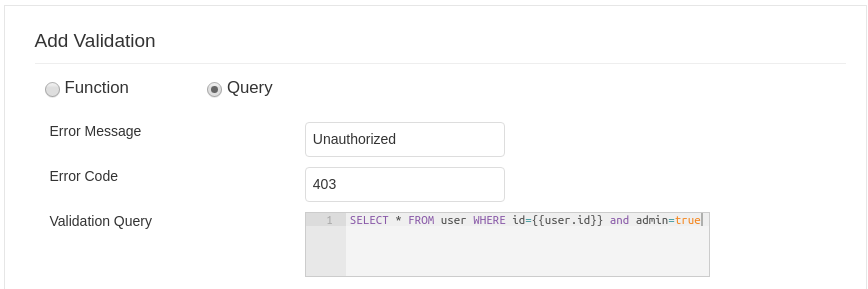
Just next to the add parameter button above the sql editor, there is a button clicking on which launches a modal. In this modal you can define the way the API parameters are going to be validated. This feature also comes in two flavors. One way is to write another SQL query which will validate the parameters and the other way is to write a python function and provide its path. Let us discuss these in more detail.
Validation using SQL query
From the launched modal select the query radio button.
In the error message field enter the error message that you want to show in case the validation fails.
In the error code field, enter the error code which you want in the response in case the validation fails.
In the query field, write the SQL query which will validate the parameters. You can even access and use the API parameters here.
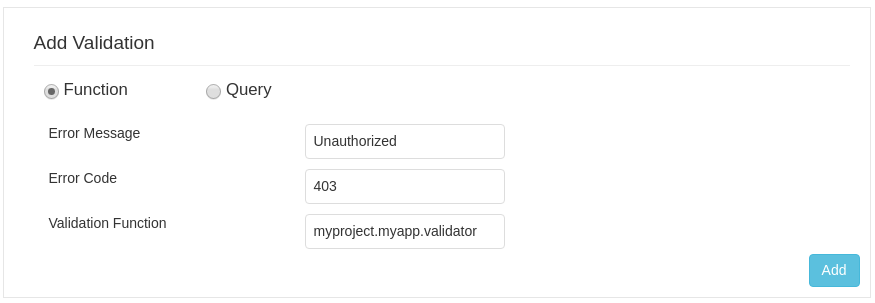
Validation using Custom python functions
From the launched modal, select the function radio button. The first two fields are same as the sql query validation. In the validation function field, enter the path considering your app as the root path.
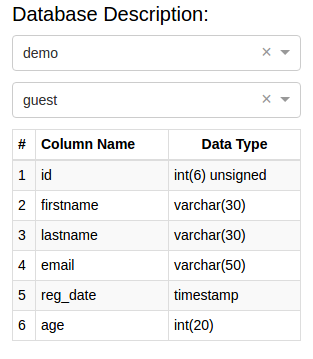
Getting Table descriptions
Every developer who has written SQL queries must have faced the problem of viewing the description of the tables to be used in the query again and again while designing the query. To solve this problem, Squealy provides a feature where you can select a database and tables from the selected database. On selecting the tables, you will get a full description of the table just next to the SQL editor.
Note: In order to use this feature, you need to define the db credentials in the DATABASES parameter in settings.py.
Minimalistic Usage
Since Squealy is based on django rest framework, you can create class based ApiViews easily. Note that for each API parameter you need to append params like this - {{params.param_name}}
from squealy.views import SqlApiView

class DatabaseTableReport(SqlApiView):
    query = "select name, sql from sqlite_master limit {{params.limit}};"
Now register your custom ApiView class to the url patterns
urlpatterns = [
  url(r'^table-report/', DatabaseTableReport.as_view()),
]
Just this much and your reporting API is ready for use.
Getting Started with YAML
Building class based APIs is cool, but squealy provides a better way to create multiple APIs just by passing one configuration file.
Lets build some simple APIs that fetch some data from database via SQL query.
- Database Connection: Squealy APIs can use any of the connections made in settings.py, via connection_name property which defaults to the default connection. For now, lets assume that the default connection is setup in settings.py.
- YAML file: Create a .yml file anywhere in your project providing the API configurations. The structure of this file is defined in detail below. For now, lets start with a minimal configuration to create 2 APIs.
---
id: api1
url: api1
query: >
   select name, sql from sqlite_master limit 5;
---
id: api2
url: api2

query: >
   select name, sql from sqlite_master limit {{params.limit}};
---
- APIs Generation: Use the ApiGenerator class to generate the squealy APIs inside your project’s urls.py.
- Test the APIs:
Run the server:
python manage.py runserver
http://localhost:8000/squealy/api1
http://localhost:8000/squealy/api2/?limit=10
Yaml Configuration
The .yml file serves as the sole input for all sorts of API configurations. The .yml file can have multiple docs (or, APIs) separated by three dashes (- - -).
Following are the supported arguments in detail. The mandatory arguments are appended with an asterisk(*) sign.
id*
This is a unique id given to each API. It is used internally by squealy for creating ApiView classes.
url*
This is the url endpoint to the API. Do not prepend the url with a ‘/’.
query*
This is the SQL query, or, more precisely, a jinjasql template with parameters bind in the query. The parameters can be extracted from the session or the GET request. The parameters are explained in detail later below.
parameters
This is a dictionary with parameter names as keys and value is further a dictionary with parameter config. The different parameter configurations are listed below.
parameters:
           param1:
                type: string
                default_value: somestring
                optional: True [False by default]
           param2:
                type: date
                format: "DD/MM/YYYY"
           param3:
                type: datetime
                format: "DD/MM/YYYY HH:mm:ss"
- There are some in-buit macros supported:
- Date - ‘today’, ‘current_day’, ‘tomorrow’, ‘next_day’
- Datetime - ‘today’, ‘now’
You can extend the squealy.parameters.Parameter class and implement the to_internal(self, value) function to create your own parameter type as well.In the yaml file, just give the function path like, ‘myapp.somepackage.MyCustomParameter’
validations
This is a very important and useful feature for API authorization. This is a list of validations which would run with every API call. If anyone of these validations return False, the API would return an error code and the request will be unauthorized.
The validation_function attribute is a path to the function that is to be used to run the validation. This can be a user defined function or one of the functions defined in the ‘squealy.validators’ module.
- The validation_function must of the following signature:
- Boolean foo(api, params, user, ...any_other_args):
The api is the complete ApiView object, params contains the parameter values passes through the url, user is the request.user object which can be used to extract session data.
There is a pre-defined function ‘squealy.validators.run_query’ which takes a sql query and if that query retutrns any rows, then the validation is passed.
validations:
 -
     error_message: "Invalid parameter: name"
     error_code: 403
     validation_function:
                         name: 'squealy.validators.run_query'
                         kwargs:
                                query: >
                                         select name from sqlite_master where {{params.name}} in ("django_migrations");
 -
     error_message: "Custom Validation Failed"
     error_code: 403
     validation_function:
                         name: 'exampleapp.custom_validators.validate_user_id'
authentication_classes
This is a list of django rest framework authentication classes which would be applied to the generated APIs.
authentication_classes:
  - SessionAuthentication
  - BasicAuthentication
  - TokenAuthentication
permission_classes
This is a list of django rest framework permission classes which would be applied to the generated APIs.
permission_classes:
  - IsAuthenticated
transformations
Squealy supports some transformations which can be very helpful to transform the response data. Below are the supported transformations:
- transpose: This transposes the output table.
- merge: merge two columns into a new column.
- split: pivot the table at a column and re-arrange the metric column accordingly.
For split transform, it is mandatory to define the columns as well.
columns:
       name:
           type: "dimension"
       sql:
           type: "dimension"
       num:
           type: "metric"

transformations:
         -
           name: "transpose"
         -
           name: "split"
           kwargs:
                  pivot_column: "name"
         -
           name: "merge"
           kwargs:
                  columns_to_merge:
                                   - "sql"
                                   - "num"
                  new_column_name: "merged_column"
You can create your custom transformations as well. Just extend the ‘squealy.tranformers.TableTransformer’ class and implement the transform(self, table). In the yaml file inside ‘name’ key, use the path to your custom transformer class, like ‘myapp.somepackage.MyCustomTransformer’
format
The default format is ‘SimpleFormatter’, which returns the data in json as a 2-D array. Other supporter formats are:
- ‘GoogleChartsFormatter’ : for google charts
- ‘HighchartsFormatter’: for HighCharts
format: 'GoogleChartsFormatter'
You can create your custom formatters as well. Just extend the ‘squealy.formatters.Formatter’ class and implement the format(self, table). In the yaml file in ‘format’ key, use the path to your custom formatter class, like ‘myapp.somepackage.MyCustomFormatter’