
This chapter will describe how reusable components can be created using pygtkhelpers delegate system. A delegate is a controller for a GTK view. It interacts closely with GTK, managing such things as signal handling.
Before we start, it is worth considering the alternative method of creating reusable components, which is custom widgets. This is not a scalable solution, in that writing custom widgets can only be performed using pure PyGTK, rather than GtkBuilder files. The maintainance requirement of coded views versus ui-designed views is large, and using custom widgets in this way would not allow component hierarchies of ui-designed interfaces.
So, what we will first need is a GTK view. This is what we want to display and take control of in our delegate. This view can be created using a UI Builder like Glade, or it can be coded by hand in XML, or in Python, or a combination of these. The delegate doesn’t care how you make your GTK, and in fact, from experience, we know that you will likely mix and match in the same view.
The first thing you will need to do is subclass the View type. This should be performed for every individual view that is required to be a reusable component. The type of View you subclass depends on whether the view is a top-level widget (Window, Dialog, ...) or a slave widget, which can be placed inside other widgets. The available delegate types are SlaveView and WindowView:
"""Reusable components, Delegate Example 1
"""
import gtk
from pygtkhelpers.delegates import WindowView

class UserView(WindowView):
    """The user interface for my user management program"""

if __name__ == '__main__':
    UserView().show_and_run()
It just shows a toplevel Window, with no widgets inside. We are going to leave that like that, and create a component to go inside. Remember reusable components, there is no point putting UI straight into the Window, although you could do that, and pygtkhelpers won’t stop you:
"""Reusable Components, Delegate Example 2
"""
import gtk
from pygtkhelpers.delegates import WindowView

class UserView(WindowView):
    """The user interface for my user management program"""
    def create_ui(self):
        """Create the user interface

           create_ui is a method called during the Delegate's
           initialisation process, to create, add to, or modify any UI
           created by GtkBuilder files.
        """
        self.entry = gtk.Entry()
        self.widget.add(self.entry)

if __name__ == '__main__':
    UserView().show_and_run()
This just adds an entry to the widget, which you can see as you run it.
As mentioned, it is best to separate components by their use, so for example in our user mangement application, the view to edit a User might be consistent throughout the application. You may want it next to a list, or you may want it in a dialog. Either way, this should be separated out into it’s own view.
This time, we will be using a SlaveView instance, which will be added to our main view. Adding slaves is achieved with the add_slave() method, and is shown in the following example:
"""Reusable Components, Delegate Example 3
"""
import gtk
from pygtkhelpers.delegates import WindowView, SlaveView

class UserView(SlaveView):
    """A view for a single user"""
    def create_ui(self):
        self.entry = gtk.Entry()
        self.widget.add(self.entry)

class ApplicationView(WindowView):
    """The main interface for my user management program"""
    def create_ui(self):
        # This time, create a slave view, and add it to the
        self.user_slave = self.add_slave(UserView(), 'widget')

if __name__ == '__main__':
    ApplicationView().show_and_run()
The main View now delegates the responsibility of the user view to one of its slaves. Of course, every slave can delegate to its own slaves, so you can build an infinite hierarchy in this way.
If we are to take a slightly more complicated user interface, it may need to be “chopped up” into further smaller slices. An example of this is shown in the diagram below:
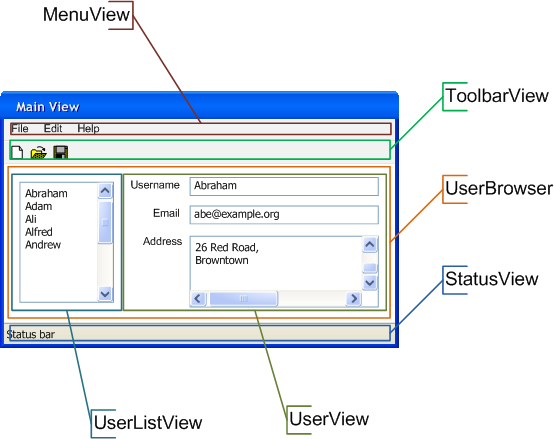
Diagram showing the possible ways to segment a complex user interface into reusable separate components.
Your application would not be much if it could not handle signals. Pygtkhelpers delegates provide ways to simplify the creation and the handling of signals.
Signal handling in delegates is performed by providing a delegate method named appropriately. An example of a delegate method for a widget named “username” for the “changed” signal would be:
def on_username__changed(self, widget):
    # handle the signal
There is no magic involved here, there are 3 components to the method name that comprise a convention:
- on_
- username__
- changed
the on_ component should be either on_ or after_ and is used to determine whether a widget is connected using gtk.Widget.connect or gtk.Widget.connect_after. The username component is the attribute name of the widget in that delegate. Again, this is not magic, any gobject that is an attribute of a delegate can be connected to. This includes widgets that are created using GtkBuilder, or widgets created in the create_ui() method. It can even include slaves, as they are gobjects if they are an attribute of a delegate. The widget name is followed by __, (double underscore). And then followed by the signal name.
The method is automatically connected to the necessary signal, and will be called appropriately. The aim here is to remove the boilerplate of signal connection, but like anything in pygtkhelpers, you are entirely free to connect your signals manually or mix both approaches, which may be appropriate if you want to connect many signals to the same callback (though in reality, this is rare)
Lets look at an example of handling a signal:
"""Reusable Components, Delegate Example 4
"""
import gtk
from pygtkhelpers.delegates import WindowView

class ApplicationView(WindowView):
    """The main interface for my user management program"""
    def create_ui(self):
        self.entry = gtk.Entry()
        self.widget.add(self.entry)

    def on_entry__changed(self, entry):
        print entry.get_text()

if __name__ == '__main__':
    ApplicationView().show_and_run()
This creates a very simple view with a single gtk.Entry, but there is a method on the delegate that connects to the changed signal. Our handler is very basic.
Let’s add a signal handler that is a bit more useful:
"""Reusable Components, Delegate Example 5
"""
import gtk
from pygtkhelpers.delegates import WindowView

class ApplicationView(WindowView):
    """The main interface for my user management program"""
    def create_ui(self):
        self.entry = gtk.Entry()
        self.widget.add(self.entry)

    def on_entry__changed(self, entry):
        print entry.get_text()

    def on_widget__delete_event(self, window, event):
        self.hide_and_quit()

if __name__ == '__main__':
    ApplicationView().show_and_run()
This handles the delete-event to our gtk.Window, that is the default “widget” for a ToplevelView. It illustrates an important point that any attribute of the delegate can have it’s signals connected to if that is a GObject instance, eg a gtk.Widget or any pygtkhelpers Delegate. As long as the item has been set as an attribute on the delegate by the end of the create_ui method, it can be connected in this way.
Pygtkhelpers has a utility function for helping to define signals for GObject instances: gsignal(). This can be used on any widget subclass, or delegate.
The following example illustrates two delegates, one receiving signals from the other, all using the simple declarative handling style above:
"""Reusable Components, Delegate Example 7
"""
import gtk
from pygtkhelpers.utils import gsignal
from pygtkhelpers.delegates import WindowView, SlaveView


class LoginView(SlaveView):

    gsignal('entry-changed')

    def create_ui(self):
        self.entry = gtk.Entry()
        self.widget.add(self.entry)

    def on_entry__changed(self, entry):
        self.emit('entry-changed')


class ApplicationView(WindowView):
    """The main interface for my user management program"""

    def create_ui(self):
        self.login_slave = self.add_slave(LoginView(), 'widget')

    def on_login_slave__entry_changed(self, slave):
        print 'entry was changed'

if __name__ == '__main__':
    ApplicationView().show_and_run()
In this example, it can be seen that since the slave is added, it can be connected to by defining the correct “on_” named method.
The gsignal function can also be used to define more complex signals with parameters, as in the following example:
"""Reusable Components, Delegate Example 6
"""
import gtk
from pygtkhelpers.utils import gsignal
from pygtkhelpers.delegates import WindowView, SlaveView


class LoginView(SlaveView):

    gsignal('entry-changed', gtk.Entry, str)

    def create_ui(self):
        self.entry = gtk.Entry()
        self.widget.add(self.entry)

    def on_entry__changed(self, entry):
        self.emit('entry-changed', entry, entry.get_text())


class ApplicationView(WindowView):
    """The main interface for my user management program"""

    def create_ui(self):
        self.login_slave = self.add_slave(LoginView(), 'widget')

    def on_login_slave__entry_changed(self, slave, entry, text):
        print 'entry %s was changed to %s' % (entry, text)

if __name__ == '__main__':
    ApplicationView().show_and_run()