Image sequences and atlases
Sometimes a single image is used to hold several images. For example, a "sprite sheet" is an image that contains each animation frame required for a character sprite animation.
pyglet provides convenience classes for extracting the individual images from such a composite image as if it were a simple Python sequence. Discrete images can also be packed into one or more larger textures with texture bins and atlases.
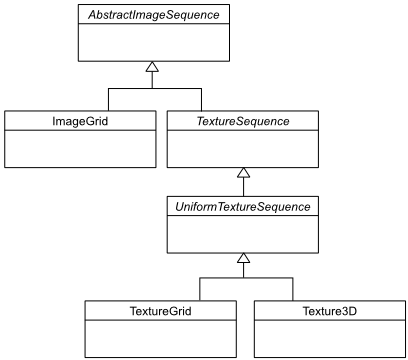
The AbstractImageSequence class hierarchy.
Image grids
An "image grid" is a single image which is divided into several smaller images by drawing an imaginary grid over it. The following image shows an image used for the explosion animation in the Astraea example.

An image consisting of eight animation frames arranged in a grid.
This image has one row and eight columns. This is all the information you need to create an ImageGrid with:
explosion = pyglet.image.load('explosion.png')
explosion_seq = pyglet.image.ImageGrid(explosion, 1, 8)
The images within the grid can now be accessed as if they were their own images:
frame_1 = explosion_seq[0]
frame_2 = explosion_seq[1]
Images with more than one row can be accessed either as a single-dimensional sequence, or as a (row, column) tuple; as shown in the following diagram.
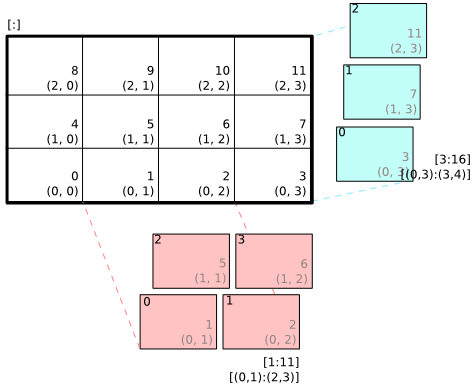
An image grid with several rows and columns, and the slices that can be used to access it.
Image sequences can be sliced like any other sequence in Python. For example, the following obtains the first four frames in the animation:
start_frames = explosion_seq[:4]
For efficient rendering, you should use a TextureGrid. This uses a single texture for the grid, and each individual image returned from a slice will be a TextureRegion:
explosion_tex_seq = image.TextureGrid(explosion_seq)
Because TextureGrid is also a Texture, you can use it either as individual images or as the whole grid at once.
3D textures
TextureGrid is extremely efficient for drawing many sprites from a single texture. One problem you may encounter, however, is bleeding between adjacent images.
When OpenGL renders a texture to the screen, by default it obtains each pixel colour by interpolating nearby texels. You can disable this behaviour by switching to the GL_NEAREST interpolation mode, however you then lose the benefits of smooth scaling, distortion, rotation and sub-pixel positioning.
You can alleviate the problem by always leaving a 1-pixel clear border around each image frame. This will not solve the problem if you are using mipmapping, however. At this stage you will need a 3D texture.
You can create a 3D texture from any sequence of images, or from an ImageGrid. The images must all be of the same dimension, however they need not be powers of two (pyglet takes care of this by returning TextureRegion as with a regular Texture).
In the following example, the explosion texture from above is uploaded into a 3D texture:
explosion_3d = pyglet.image.Texture3D.create_for_image_grid(explosion_seq)
You could also have stored each image as a separate file and used Texture3D.create_for_images to create the 3D texture.
Once created, a 3D texture behaves like any other ImageSequence; slices return TextureRegion for an image plane within the texture. Unlike a TextureGrid, though, you cannot blit a Texture3D in its entirety.
Texture bins and atlases
Image grids are useful when the artist has good tools to construct the larger images of the appropriate format, and the contained images all have the same size. However it is often simpler to keep individual images as separate files on disk, and only combine them into larger textures at runtime for efficiency.
A TextureAtlas is initially an empty texture, but images of any size can be added to it at any time. The atlas takes care of tracking the "free" areas within the texture, and of placing images at appropriate locations within the texture to avoid overlap.
It's possible for a TextureAtlas to run out of space for new images, so applications will need to either know the correct size of the texture to allocate initally, or maintain multiple atlases as each one fills up.
The TextureBin class provides a simple means to manage multiple atlases. The following example loads a list of images, then inserts those images into a texture bin. The resulting list is a list of TextureRegion images that map into the larger shared texture atlases:
images = [
    pyglet.image.load('img1.png'),
    pyglet.image.load('img2.png'),
    # ...
]

bin = pyglet.image.atlas.TextureBin()
images = [bin.add(image) for image in images]
The pyglet.resource module (see Application resources) uses texture bins internally to efficiently pack images automatically.