Displays, screens, configs and contexts

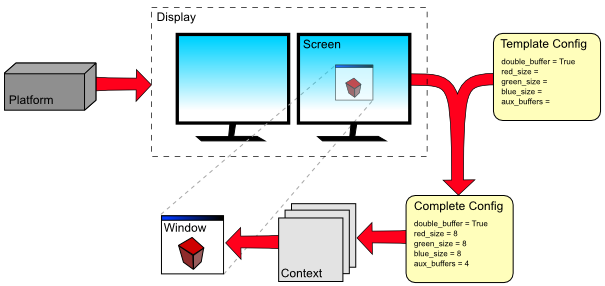
Flow of construction, from the singleton Platform to a newly created Window with its Context.
Contexts and configs
When you draw on a window in pyglet, you are drawing to an OpenGL context. Every window has its own context, which is created when the window is created. You can access the window's context via its context attribute.
The context is created from an OpenGL configuration (or "config"), which describes various properties of the context such as what color format to use, how many buffers are available, and so on. You can access the config that was used to create a context via the context's config attribute.
For example, here we create a window using the default config and examine some of its properties:
>>> import pyglet
>>> window = pyglet.window.Window()
>>> context = window.context
>>> config = context.config
>>> config.double_buffer
c_int(1)
>>> config.stereo
c_int(0)
>>> config.sample_buffers
c_int(0)
Note that the values of the config's attributes are all ctypes instances. This is because the config was not specified by pyglet. Rather, it has been selected by pyglet from a list of configs supported by the system. You can make no guarantee that a given config is valid on a system unless it was provided to you by the system.
pyglet simplifies the process of selecting one of the system's configs by allowing you to create a "template" config which specifies only the values you are interested in. See Simple context configuration for details.
Displays
The system may actually support several different sets of configs, depending on which display device is being used. For example, a computer with two video cards would have not support the same configs on each card. Another example is using X11 remotely: the display device will support different configurations than the local driver. Even a single video card on the local computer may support different configs for the two monitors plugged in.
In pyglet, a "display" is a collection of "screens" attached to a single display device. On Linux, the display device corresponds to the X11 display being used. On Windows and Mac OS X, there is only one display (as these operating systems present multiple video cards as a single virtual device).
There is a singleton class Platform which provides access to the display(s); this represents the computer on which your application is running. It is usually sufficient to use the default display:
>>> platform = pyglet.window.get_platform()
>>> display = platform.get_default_display()
On X11, you can specify the display string to use, for example to use a remotely connected display. The display string is in the same format as used by the DISPLAY environment variable:
>>> display = platform.get_display('remote:1.0')
You use the same string to specify a separate X11 screen [6]:
>>> display = platform.get_display(':0.1')
Screens
Once you have obtained a display, you can enumerate the screens that are connected. A screen is the physical display medium connected to the display device; for example a computer monitor, TV or projector. Most computers will have a single screen, however dual-head workstations and laptops connected to a projector are common cases where more than one screen will be present.
In the following example the screens of a dual-head workstation are listed:
>>> for screen in display.get_screens():
...     print screen
...
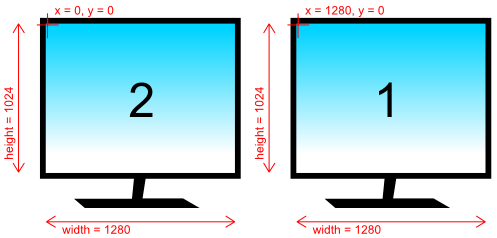
XlibScreen(screen=0, x=1280, y=0, width=1280, height=1024, xinerama=1)
XlibScreen(screen=0, x=0, y=0, width=1280, height=1024, xinerama=1)
Because this workstation is running Linux, the returned screens are XlibScreen, a subclass of Screen. The screen and xinerama attributes are specific to Linux, but the x, y, width and height attributes are present on all screens, and describe the screen's geometry, as shown below.

Example arrangement of screens and their reported geometry. Note that the primary display (marked "1") is positioned on the right, according to this particular user's preference.
There is always a "default" screen, which is the first screen returned by get_screens. Depending on the operating system, the default screen is usually the one that contains the taskbar (on Windows) or menu bar (on OS X). You can access this screen directly using get_default_screen.
| [6] | Assuming Xinerama is not being used to combine the screens. If Xinerama is enabled, use screen 0 in the display string, and select a screen in the same manner as for Windows and Mac OS X. |