glitter Example: Introduction
Summary
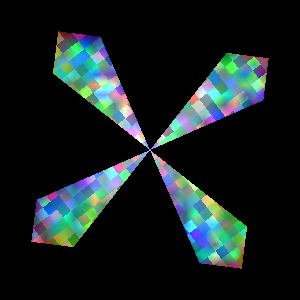
This program will open a GLUT window and render a textured, rotating fan, overlaid with a textured background. To illustrate the use of framebuffer objects, the scene will first be rendered to a texture, then displayed on screen by a different shader. This example has been adapted from OpenGLBook.com.
This is a fairly advanced "introductory" example using vertex arrays, shader programs, pipelines, textures, and logging. If you are looking for something simpler (but less complete) to start with, look at the simple example.
Front matter
Module docstring
The module docstring is used as a description of this example in the generated documentation:
"""Basic example using L{VertexArray}s, L{ShaderProgram}s, L{Pipeline}s, L{Texture}s, and logging.

@author: Stephan Wenger
@date: 2012-02-29
"""
Imports
glitter can use the logging module for logging all OpenGL commands issued by the library. The log entries are emitted at DEBUG level, so we enable printing of debug messages:
import logging
logging.basicConfig(level=logging.DEBUG)
Our scene is going to rotate. The rotating modelview matrix is computed using the sine and cosine functions from the math module:
from math import sin, cos, pi
glitter uses numpy for
representation of array data. We will use numpy's random()
function to generate random textures:
from numpy.random import random
We can usually import classes and functions contained in glitter submodules directly from glitter:
from glitter import ShaderProgram, RectangleTexture, Texture2D, Pipeline, VertexArray, add_logger
Modules with external dependencies other than numpy, such as platform dependent parts like methods for the generation of an OpenGL context, however, have to be imported from their respective submodules:
from glitter.contexts.glut import GlutWindow, main_loop, get_elapsed_time
Shaders
Primary shader program
In the OpenGL core profile, there is no such thing as a "standard pipeline"
any more. We can either use the minimalistic defaultpipeline
from the glitter.convenience module, or define our own shaders.
We'll do the latter since we want some additional functionality. Instead of
loading the shader from a file at runtime, we can define it inline as a
Python string:
vertex_shader = """
#version 400 core

layout(location=0) in vec4 in_position;
layout(location=1) in vec4 in_color;
uniform mat4 modelview_matrix;
out vec4 ex_color;
out vec2 ex_texcoord;

void main() {
    gl_Position = modelview_matrix * in_position;
    ex_color = in_color;
    ex_texcoord = in_position.xy * 0.5 + 0.5;
}
"""
The vertex shader will receive its per-vertex inputs in_position
and in_color from a vertex array. The uniform variable
modelview_matrix will be set directly on the shader program
object. The varying values ex_color and ex_texcoord
are passed to the fragment shader.
The fragment shader is executed once for every rasterized fragment. It
receives interpolated values for ex_color and
ex_texcoord from the vertex shader, reads from textures
texture_0 and texture_1, and writes the fragment
color to out_color, which is written to a texture by the
framebuffer object.
fragment_shader = """
#version 400 core
#extension GL_ARB_texture_rectangle : enable

in vec4 ex_color;
in vec2 ex_texcoord;
uniform sampler2D texture_0;
uniform sampler2DRect texture_1;
layout(location=0) out vec4 out_color;

void main() {
    out_color = 0.5 * ex_color
    + texture(texture_0, ex_texcoord)
    * texture(texture_1, gl_FragCoord.xy / 10.0)
    ;
}
"""
The textures that are used by the fragment shader are automatically bound to free texture units by the shader object.
Copying shader program
To copy the image from a texture to the screen, we will use the following simple shaders:
copy_vertex_shader = """
#version 400 core

layout(location=0) in vec4 in_position;

void main() {
    gl_Position = in_position;
}
"""

copy_fragment_shader = """
#version 400 core
#extension GL_ARB_texture_rectangle : enable

uniform sampler2DRect image;
layout(location=0) out vec4 out_color;

void main() {
    out_color = texture(image, gl_FragCoord.xy);
}
"""
Vertex arrays
The geometry is specified as arrays (or nested lists) of vertices, colors, and indices into the vertex and color arrays. Lists are automatically converted to appropriate numpy arrays. The shape of these arrays describes how the arrays are to be drawn. When an index array is used, as in this example, the vertex and color arrays are two-dimensional: the first dimension is the number of vertices, the second is the number of values for each vertex (e.g. the red, green, blue, and alpha channels for a color array). The shape of the index array is also two-dimensional: the first dimension is the number of primitives to be drawn, the second is the number of vertices in each primitive. Here, we draw sixteen triangles.
vertices = (
    ( 0.0,  0.0, 0.0, 1.0), # center
    (-0.2,  0.8, 0.0, 1.0), ( 0.2,  0.8, 0.0, 1.0), ( 0.0,  0.8, 0.0, 1.0), ( 0.0,  1.0, 0.0, 1.0), # top
    (-0.2, -0.8, 0.0, 1.0), ( 0.2, -0.8, 0.0, 1.0), ( 0.0, -0.8, 0.0, 1.0), ( 0.0, -1.0, 0.0, 1.0), # bottom
    (-0.8, -0.2, 0.0, 1.0), (-0.8,  0.2, 0.0, 1.0), (-0.8,  0.0, 0.0, 1.0), (-1.0,  0.0, 0.0, 1.0), # left
    ( 0.8, -0.2, 0.0, 1.0), ( 0.8,  0.2, 0.0, 1.0), ( 0.8,  0.0, 0.0, 1.0), ( 1.0,  0.0, 0.0, 1.0), # right
    )

colors = (
    (1.0, 1.0, 1.0, 1.0), # center
    (0.0, 1.0, 0.0, 1.0), (0.0, 0.0, 1.0, 1.0), (0.0, 1.0, 1.0, 1.0), (1.0, 0.0, 0.0, 1.0), # top
    (0.0, 0.0, 1.0, 1.0), (0.0, 1.0, 0.0, 1.0), (0.0, 1.0, 1.0, 1.0), (1.0, 0.0, 0.0, 1.0), # bottom
    (0.0, 1.0, 0.0, 1.0), (0.0, 0.0, 1.0, 1.0), (0.0, 1.0, 1.0, 1.0), (1.0, 0.0, 0.0, 1.0), # left
    (0.0, 0.0, 1.0, 1.0), (0.0, 1.0, 0.0, 1.0), (0.0, 1.0, 1.0, 1.0), (1.0, 0.0, 0.0, 1.0), # right
    )

indices = (
    (0,  1,  3), (0,  3,  2), ( 3,  1,  4), ( 3,  4,  2), # top
    (0,  5,  7), (0,  7,  6), ( 7,  5,  8), ( 7,  8,  6), # bottom
    (0,  9, 11), (0, 11, 10), (11,  9, 12), (11, 12, 10), # left
    (0, 13, 15), (0, 15, 14), (15, 13, 16), (15, 16, 14), # right
    )
If no index array is given, the vertex and color arrays are three-dimensional: the first dimension is then the number of primitives, the second is the number of vertices per primitive, and the third is the number of values per vertex. Since in a typical geometry several primitives share a common vertex, it is usually more memory efficient to use an index array.
Main class
We wrap all the OpenGL interaction in a class. The class will contain an
__init__() method to set up all OpenGL objects, any required
callback methods, as well as a run() method to trigger execution
of the GLUT main loop.
class IntroductionExample(object):
Initialization
When an IntroductionExample instance is created, we need to
initialize a few OpenGL objects.
def __init__(self):
First, we create a window; this also creates an OpenGL context.
self.window = GlutWindow(double=True, multisample=True)
Then, we set the GLUT display and keyboard callback functions which will be defined later.
        self.window.display_callback = self.display
        self.window.keyboard_callback = self.keyboard
A shader program is built from the previously defined vertex and fragment codes:
self.shader = ShaderProgram(vertex=vertex_shader, fragment=fragment_shader)
This shader program is then used to build a pipeline. A pipeline is a
convenience object that encapsulates a vertex array for input, a
shader program for processing, and a framebuffer for output. The
framebuffer is optional (we could render directly to the screen if we
wanted), but we will render into a texture and copy the texture to
the screen for instructional purposes. The Pipeline
constructor automatically creates an empty vertex array and a
framebuffer with no attachments. Named constructor arguments are
interpreted as attributes of the vertex array and the framebuffer or
as named inputs and outputs of the shader. This means we can directly
pass in arrays of vertices and colors that will be bound to
in_position and in_color, respectivey, as
well as the array of element indices to draw and an empty texture to
bind to the framebuffer:
        self.render_pipeline = Pipeline(self.shader, in_position=vertices, in_color=colors,
                elements=indices, out_color=RectangleTexture(shape=(300, 300, 3)))
Shader uniform variables like textures can also be set directly on the pipeline. Here we initialize two textures with random data:
        self.render_pipeline.texture_0 = Texture2D(random((30, 30, 4)))
        self.render_pipeline.texture_1 = RectangleTexture(random((30, 30, 4)))
Many properties, such as the filtering mode for textures, can directly be set as attributes on the corresponding objects:
        self.render_pipeline.texture_0.min_filter = Texture2D.min_filters.NEAREST
        self.render_pipeline.texture_0.mag_filter = Texture2D.mag_filters.NEAREST
For copying the texture to the screen, we create another shader program.
self.copy_shader = ShaderProgram(vertex=copy_vertex_shader, fragment=copy_fragment_shader)
The input texture of this shader program is the output texture of the previous pipeline. Since all textures and framebuffers are automatically bound and unbound, we do not need to worry about whether the framebuffer is still writing to the texture.
self.copy_shader.image = self.render_pipeline.out_color
Instead of using a pipeline with named vertex shader inputs, we can
also create a vertex array object directly with a list of vertex
shader inputs to use. Here we use only a single vertex shader input:
the coordinates of a fullscreen quad. The elements
parameter defines two triangles that make up the quad.
self.vao = VertexArray(((-1.0, -1.0), (-1.0, 1.0), (1.0, 1.0), (1.0, -1.0)), elements=((0, 1, 2), (0, 2, 3)))
Callback functions
Display function
Here we define the display function. It will be called by GLUT whenever the screen has to be redrawn.
def display(self):
We can simply clear the pipeline and render the vertices into the framebuffer using the shader with the following two lines:
        self.render_pipeline.clear()
        self.render_pipeline.draw()
For output on the screen, we have created a GLUT window. It can be cleared in very much the same way:
self.window.clear()
To copy the results of the pipeline to the screen, we use the shader
that simply displays a texture. The shader can be bound by using a
with statement:
with self.copy_shader:
All textures used by the shader are then bound automatically, and
everything is reset to its previous state when we leave the
with block.
With the shader bound, we simply draw a fullscreen quad that is stored in a vertex array we will create in the initialization section:
self.vao.draw()
After all rendering commands have been issued, we swap the back buffer to the front, making the rendered image visible all at once:
self.window.swap_buffers()
Finally, we disable logging so that we only see the OpenGL calls of the first run of the display function:
add_logger(None)
Keyboard function
To further illustrate the concept of GLUT callbacks, here's a keyboard handler that will simply make the program exit when any key is pressed:
    def keyboard(self, key, x, y):
        raise SystemExit
Timer function
The animation is controlled by a GLUT timer. The timer callback changes the modelview matrix, schedules the next timer event, and causes a screen redraw:
def timer(self):
We first get the elapsed time from GLUT using
get_elapsed_time():
        t = get_elapsed_time()
        phi = 2 * pi * t / 4.0
We then set the modelview_matrix uniform variable of the
shader created in the initialization section simply by setting an
attribute:
self.shader.modelview_matrix = ((cos(phi), sin(phi), 0, 0), (-sin(phi), cos(phi), 0, 0), (0, 0, 1, 0), (0, 0, 0, 1))
The following line schedules the next timer event to execute after ten milliseconds.
self.window.add_timer(10, self.timer)
Finally, we tell GLUT to redraw the screen.
self.window.post_redisplay()
Running
We will call the run() method later to run the OpenGL code.
def run(self):
To start the animation, we call the timer once; all subsequent timer calls will be scheduled by the timer function itself.
self.timer()
Now that all the initialization is done, we add the default logger to all OpenGL commands so that we can see what OpenGL the display function issues, and in which order.
add_logger()
Finally, to start rendering, we enter the GLUT main loop.
main_loop()
When the main loop exits, control is handed back to the script, unless
SystemExit has been raised by the keyboard handler.
Main section
Finally, if this program is being run from the command line, we instanciate the main class and run it.
if __name__ == "__main__":
    IntroductionExample().run()