Tutorials
First step: prepare the connection and login
You need an instance of the OERP class to dialog with an OpenERP/Odoo server. Let’s pretend that you want to connect as admin on the db_name database of your local server (with the XML-RPC service which listens on port 8071). First, prepare the connection:
>>> import oerplib
>>> oerp = oerplib.OERP(server='localhost', protocol='xmlrpc', port=8071)
You can also specify the default database to use with the database parameter:
>>> oerp = oerplib.OERP(server='localhost', database='db_name', protocol='xmlrpc', port=8071)
To check databases available, use the oerp.db attribute with the list method:
>>> oerp.db.list()
['db_name', 'db_name2', ...]
The connection is ready, you are able to log in on the server with the account of your choice:
>>> user = oerp.login(user='admin', passwd='admin')
Or, if no default database was specified before:
>>> user = oerp.login(user='admin', passwd='admin', database='db_name')
The login method returns an object representing the user connected. It is built from the server-side model res.users, and all its informations are accessible (see Browse records section):
>>> print(user.name)            # print the full name of the user
>>> print(user.company_id.name) # print the name of its company
Now you are connected, you can easily execute any kind of RPC queries on your server (execute model methods, trigger workflow, download reports, and handle wizards).
Execute queries
The basic method to execute queries (related to the /object RPC service) is execute. It takes at least two parameters (model name and the method name) following by variable parameters according to the method called. Example:
>>> order_data = oerp.execute('sale.order', 'read', [1], ['name'])
This instruction will call the read method of the model sale.order with the parameters [1] (list of record IDs) and ['name'] (list of fields to return).
However, for usual methods such as create, read, write, unlink and search there are convenient shortcuts available (see oerplib.OERP):
>>> partner_id = oerp.create('res.partner', {'name': 'Jacky Bob', 'lang': 'fr_FR'})
>>> partner_data = oerp.read('res.partner', [partner_id], ['name'])
>>> oerp.write('res.partner', [partner_id], {'name': 'Charly Bob'})
True
>>> partner_ids = oerp.search('res.partner', [('name', 'ilike', 'Bob')])
>>> oerp.unlink('res.partner', [partner_id])
True
There is another way to perform all methods of a model, with the get method, which provides an API almost syntactically identical to the OpenERP/Odoo server side API (see oerplib.service.osv.Model):
>>> user_obj = oerp.get('res.users')
>>> user_obj.write([1], {'name': "Dupont D."})
True
>>> context = user_obj.context_get()
>>> context
{'lang': 'fr_FR', 'tz': False}
>>> product_obj = oerp.get('product.product')
>>> product_obj.name_get([3, 4])
[[3, '[PC1] PC Basic'], [4, u'[PC2] Basic+ PC (assembl\xe9 sur commande)']]
If you run a server in version 6.1 or above, the user context is automatically sent. You can disable this behaviour with the oerplib.OERP.config property:
>>> oerp.config['auto_context'] = False
>>> product_obj.name_get([3, 4])    # Without context, lang 'en_US' by default
[[3, '[PC1] Basic PC'], [4, '[PC2] Basic+ PC (assembly on order)']]
Note
The auto_context option only affect model methods.
Here is another example of how to install a module (you have to be logged as an administrator to perform this task). The button_immediate_install method used here is available since the 6.1 server version:
>>> module_obj = oerp.get('ir.module.module')
>>> module_id = module_obj.search([('name', '=', 'purchase')])
>>> module_obj.button_immediate_install(module_id)
Browse records
A great functionality of OERPLib is its ability to generate objects that are similar to browsable records used on the server side. All of this is possible using the browse method:
# fetch one record
partner = oerp.browse('res.partner', 1) # Partner ID = 1
print(partner.name)
# fetch several records
for partner in oerp.browse('res.partner', [1, 2]):
    print(partner.name)
From such objects, it is possible to easily explore relationships. The related records are generated on the fly:
partner = oerp.browse('res.partner', 3)
for child in partner.child_ids:
    print(child.name)
You can browse objects through a model too. In fact, both methods are strictly identical, oerplib.OERP.browse() is simply a shortcut to the other:
>>> partner1 = oerp.browse('res.partner', 3)
>>> partner2 = oerp.get('res.partner').browse(3)
>>> partner1 == partner2
True
Outside relation fields, Python data types are used, like datetime.date and datetime.datetime:
>>> order = oerp.browse('purchase.order', 42)
>>> order.minimum_planned_date
datetime.datetime(2012, 3, 10, 0, 0)
>>> order.date_order
datetime.date(2012, 3, 8)
A list of data types used by browse_record fields are available here.
Update data through browsable records
Update data of a browsable record is workable with the write_record method of an OERP instance. Let’s update the name of a partner:
>>> partner.name = "Caporal Jones"
>>> oerp.write_record(partner)
This is equivalent to:
>>> oerp.write('res.partner', [partner.id], {'name': "Caporal Jones"})
Char, Float, Integer, Boolean, Text and Binary
As see above, it’s as simple as that:
>>> partner.name = "New Name"
>>> oerp.write_record(partner)
Selection
Same as above, except there is a check about the value assigned. For instance, the field type of the res.partner model accept values contains in ['default', 'invoice', 'delivery', 'contact', 'other']:
>>> partner.type = 'default' # Ok
>>> partner.type = 'foobar'  # Error!
Traceback (most recent call last):
  File "<stdin>", line 1, in <module>
  File "oerplib/fields.py", line 58, in setter
    value = self.check_value(value)
  File "oerplib/fields.py", line 73, in check_value
    field_name=self.name,
ValueError: The value 'foobar' supplied doesn't match with the possible values '['default', 'invoice', 'delivery', 'contact', 'other']' for the 'type' field
Many2One
You can also update a many2one field, with either an ID or a browsable record:
>>> partner.parent_id = 1 # with an ID
>>> oerp.write_record(partner)
>>> parent = oerp.browse('res.partner', 1) # with a browsable record
>>> partner.parent_id = parent
>>> oerp.write_record(partner)
You can’t put any ID or browsable record, a check is made on the relationship to ensure data integrity:
>>> user = oerp.browse('res.users', 1)
>>> partner = oerp.browse('res.partner', 2)
>>> partner.parent_id = user
Traceback (most recent call last):
  File "<stdin>", line 1, in <module>
  File "oerplib/fields.py", line 128, in setter
    o_rel = self.check_value(o_rel)
  File "oerplib/fields.py", line 144, in check_value
    field_name=self.name))
ValueError: Instance of 'res.users' supplied doesn't match with the relation 'res.partner' of the 'parent_id' field.
One2Many and Many2Many
one2many and many2many fields can be updated by providing a list of tuple as specified in the OpenERP/Odoo documentation, a list of records, a list of record IDs or an empty list or False:
With a tuple (as documented), no magic here:
>>> user = oerp.get('res.users').browse(1)
>>> user.groups_id = [(6, 0, [8, 5, 6, 4])]
>>> oerp.write_record(user)
With a list of records:
>>> user = oerp.get('res.users').browse(1)
>>> groups = oerp.get('res.groups').browse([8, 5, 6, 4])
>>> user.groups_id = list(groups)
>>> oerp.write_record(user)
With a list of record IDs:
>>> user = oerp.get('res.users').browse(1)
>>> user.groups_id = [8, 5, 6, 4]
>>> oerp.write_record(user)
The last two examples are equivalent to the first (they generate a (6, 0, IDS) tuple).
However, if you set an empty list or False, a (5, ) tuple will be generated to cut the relation between records:
>>> user = oerp.get('res.users').browse(1)
>>> user.groups_id = []
>>> list(user.groups_id)
[]
>>> user.__data__['updated_values']['groups_id']
[(5,)]
>>> user.groups_id = False
>>> list(user.groups_id)
[]
>>> user.__data__['updated_values']['groups_id']
[(5,)]
Another facility provided by OERPLib is adding and removing objects using Python operators += and -=. As usual, you can add an ID, a record, or a list of them:
With a list of records:
>>> user = oerp.get('res.users').browse(1)
>>> groups = oerp.get('res.groups').browse([4, 5])
>>> user.groups_id += list(groups)
>>> [g.id for g in user.groups_id]
[1, 2, 3, 4, 5]
With a list of record IDs:
>>> user.groups_id += [4, 5]
>>> [g.id for g in user.groups_id]
[1, 2, 3, 4, 5]
With an ID only:
>>> user.groups_id -= 4
>>> [g.id for g in user.groups_id]
[1, 2, 3, 5]
With a record only:
>>> group = oerp.get('res.groups').browse(5)
>>> user.groups_id -= group
>>> [g.id for g in user.groups_id]
[1, 2, 3]
Reference
To update a reference field, you have to use either a string or a browsable record as below:
>>> helpdesk = oerp.browse('crm.helpdesk', 1)
>>> helpdesk.ref = 'res.partner,1' # with a string with the format '{relation},{id}'
>>> oerp.write_record(helpdesk)
>>> partner = oerp.browse('res.partner', 1)
>>> helpdesk.ref = partner # with a browsable record
>>> oerp.write_record(helpdesk)
A check is made on the relation name:
>>> helpdesk.ref = 'foo.bar,42'
Traceback (most recent call last):
  File "<stdin>", line 1, in <module>
  File "oerplib/service/osv/fields.py", line 213, in __set__
    value = self.check_value(value)
  File "oerplib/service/osv/fields.py", line 244, in check_value
    self._check_relation(relation)
  File "oerplib/service/osv/fields.py", line 225, in _check_relation
    field_name=self.name,
ValueError: The value 'foo.bar' supplied doesn't match with the possible values '['res.partner', 'calendar.event', 'crm.meeting']' for the 'ref' field
Date and Datetime
date and datetime fields accept either string values or datetime.date/datetime.datetime objects.
With datetime.date and datetime.datetime objects:
>>> import datetime
>>> order = oerp.browse('purchase.order', 42)
>>> order.date_order = datetime.date(2011, 9, 20)
>>> order.minimum_planned_date = datetime.datetime(2011, 9, 20, 12, 31, 24)
>>> oerp.write_record(order)
With formated strings:
>>> order.date_order = "2011-09-20"                     # %Y-%m-%d
>>> order.minimum_planned_date = "2011-09-20 12:31:24"  # %Y-%m-%d %H:%M:%S
>>> oerp.write_record(order)
As always, a wrong type will raise an exception:
>>> order.date_order = "foobar"
Traceback (most recent call last):
  File "<stdin>", line 1, in <module>
  File "oerplib/fields.py", line 187, in setter
    value = self.check_value(value)
  File "oerplib/fields.py", line 203, in check_value
    self.pattern))
ValueError: Value not well formatted, expecting '%Y-%m-%d' format
Generate reports
Another nice functionnality is the reports generation (related to the /report RPC service) with the report method. You have to supply the name of the report, the name of the model and the ID of the record related:
>>> oerp.report('sale.order', 'sale.order', 1)
'/tmp/oerplib_uJ8Iho.pdf'
>>> oerp.report('webkitaccount.invoice', 'account.invoice', 1)
'/tmp/oerplib_r1W9jG.pdf'
The method will return the path to the generated temporary report file.
Manage databases
You can manage server databases with the oerplib.OERP.db property. It offers you a dynamic access to all methods of the /db RPC service in order to list, create, drop, dump, restore databases and so on.
Note
You have not to be logged in to perform database management tasks. Instead, you have to use the “super admin” password.
Prepare a connection:
>>> import oerplib
>>> oerp = oerplib.OERP(server='localhost')
At this point, you are able to list databases of this server:
>>> oerp.db.list()
[]
Let’s create a new database:
>>> database_id = oerp.db.create('super_admin_passwd', 'test_db', False, 'fr_FR', 'admin')
The creation process may take some time on the server, and you have to wait before using the new database. The state of the creation process is returned by the get_progress method:
>>> database_id = oerp.db.create('super_admin_passwd', 'test_db', False, 'fr_FR', 'admin')
>>> while not oerp.db.get_progress('super_admin_passwd', database_id)[0]
...     pass
>>> oerp.login('admin', 'admin', 'test_db')
However, OERPLib simplifies this by providing the create_and_wait method:
>>> oerp.db.create_and_wait('super_admin_passwd', 'test_db', False, 'fr_FR', 'admin')
[{'login': u'admin', 'password': u'admin', 'name': u'Administrator'},
 {'login': u'demo', 'password': u'demo', 'name': u'Demo User'}]
Some documentation about methods offered by the /db RPC service is available here.
Inspect the metadata of your server (New in version 0.8)
Draw a graph of relationships between models
Note
This functionality requires the installation of pydot.
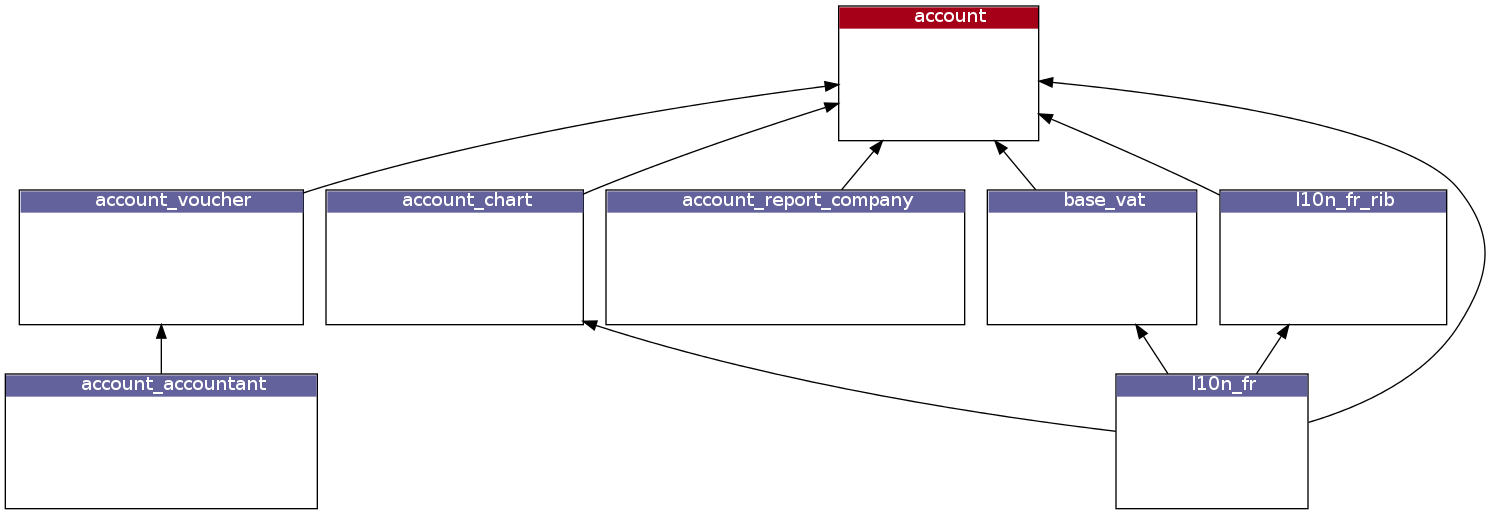
The relations method will help you to generate a graphic of such relationships:
>>> graph = oerp.inspect.relations(['res.partner'])
>>> graph.write('rel_res_partner_v1.png', format='png')
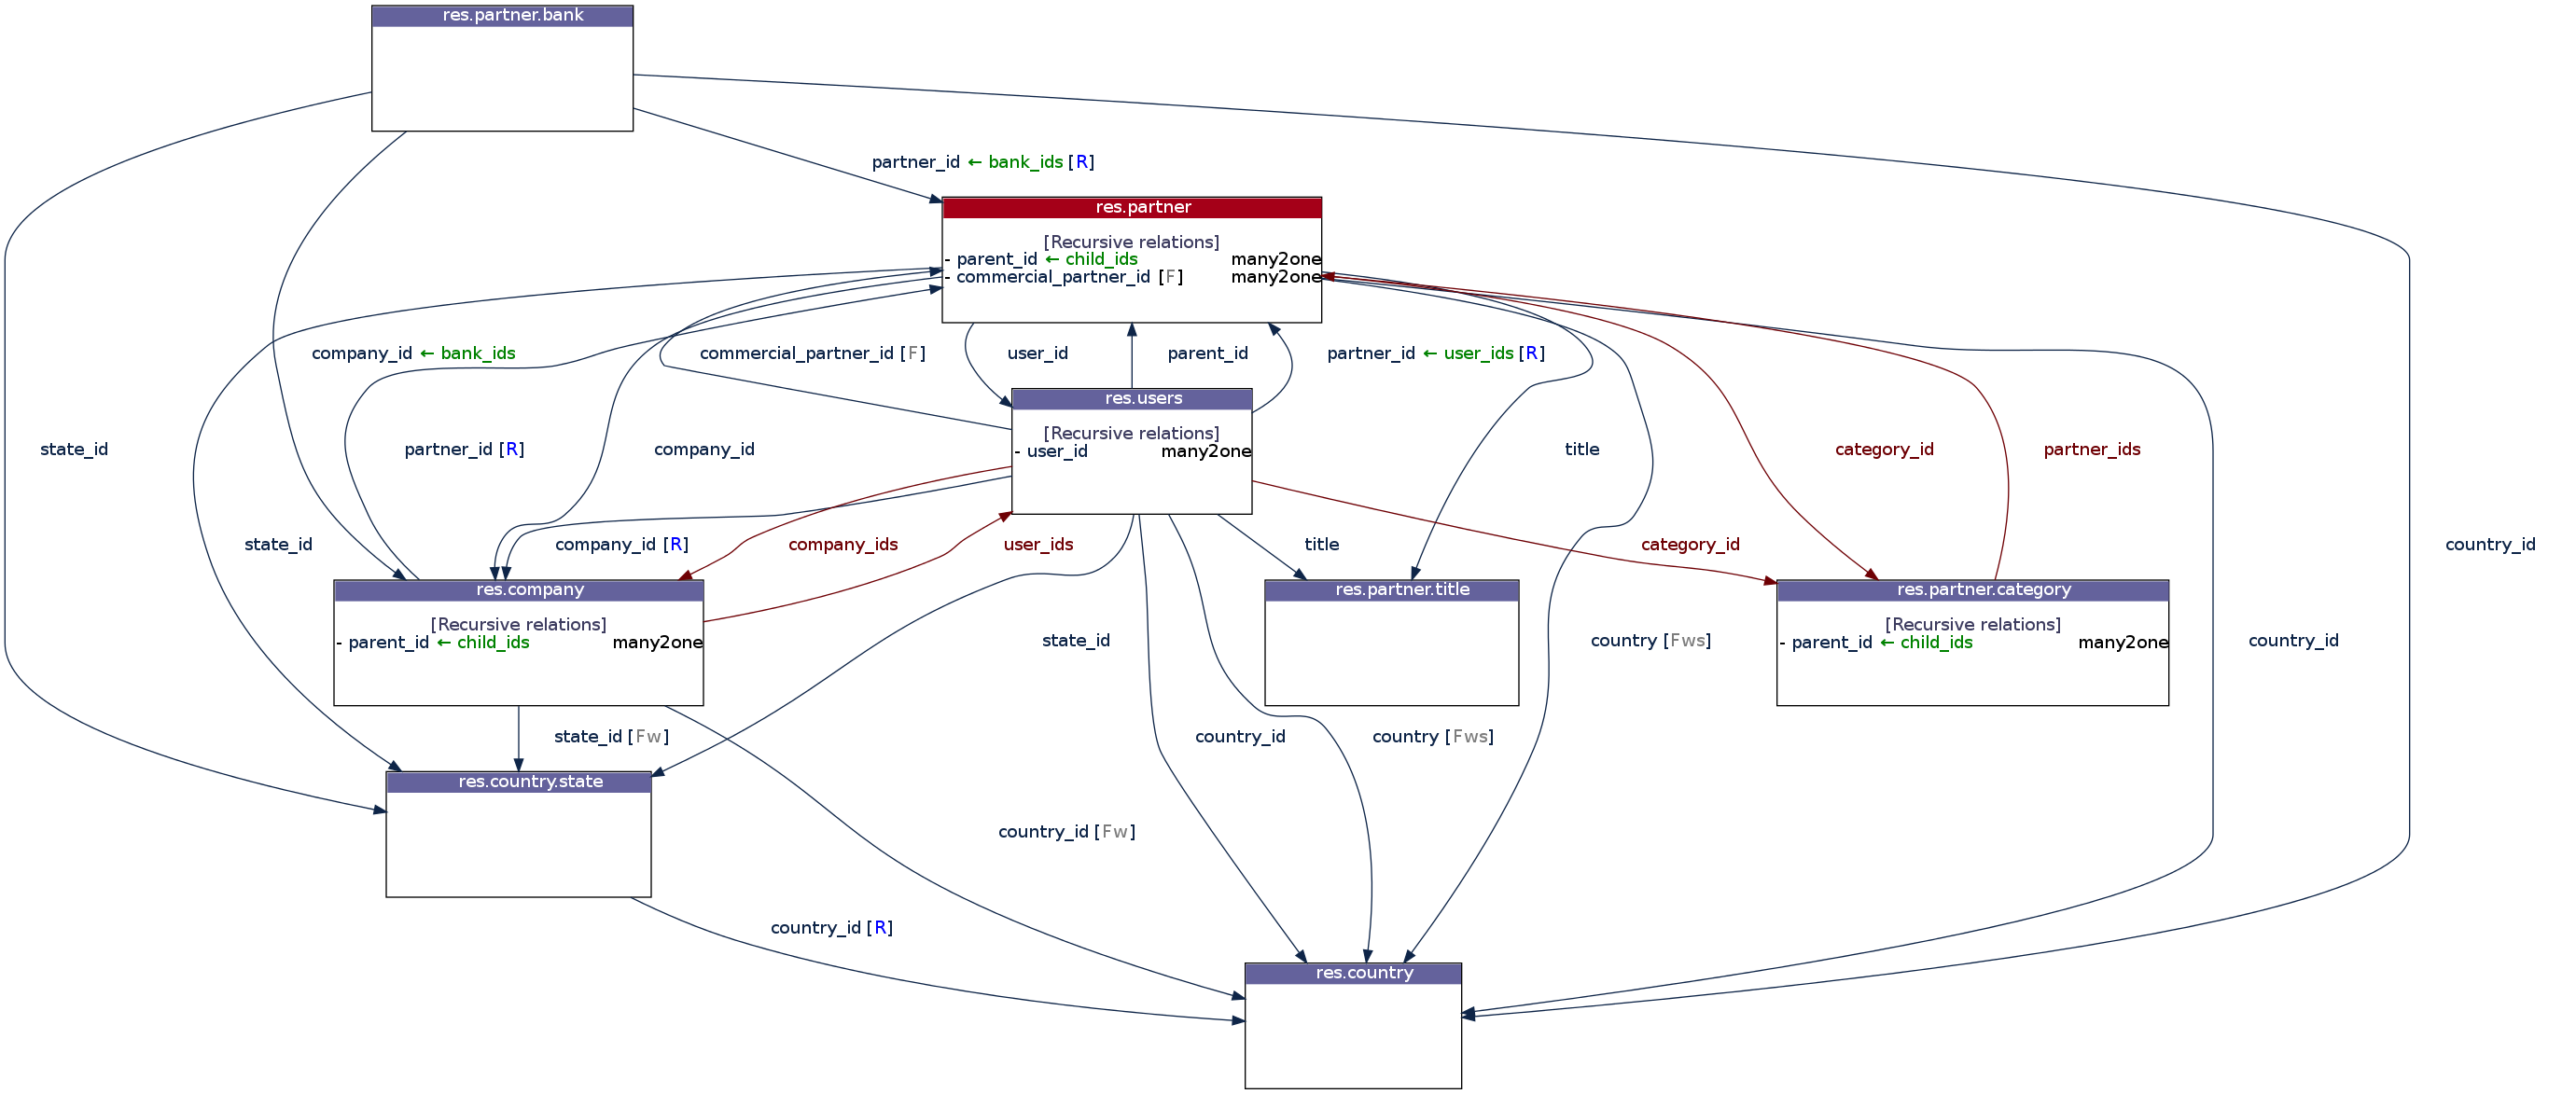
Legend:
| Element | Meaning |
|---|---|
partner_id |
many2one |
bank_ids |
one2many |
company_ids |
many2many |
[R] |
Field required |
[F] |
Field function (readonly) |
[Fw] |
Field function (writable) |
[Fs] |
Field function (searchable) |
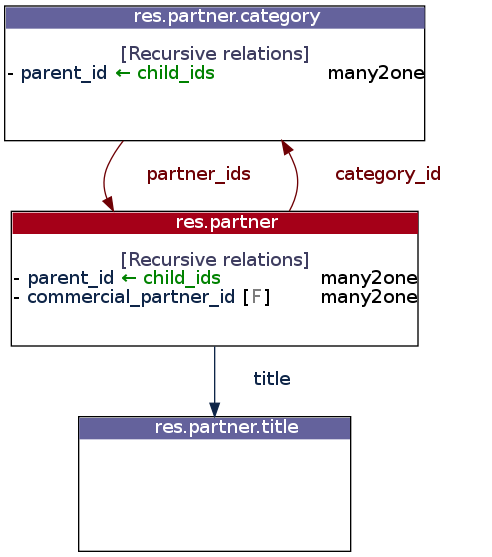
By default, only the direct relationships of the model res.partner are shown (this behaviour can be changed with the maxdepth parameter), and model attributes are hidden. You can control the displayed models through the whitelist and blacklist parameters. For instance, assume that you only want data models whose name begins with res.partner excluding the res.partner.bank model:
>>> graph = oerp.inspect.relations(['res.partner'], whitelist=['res.partner*'], blacklist=['res.partner.bank'])  # Notice the use of wildcard here
>>> graph.write('rel_res_partner_v2.png', format='png')
Note
The blacklist has a higher priority than the whitelist
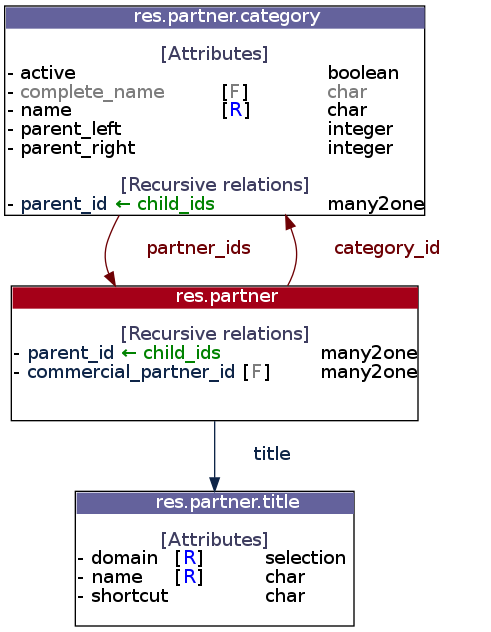
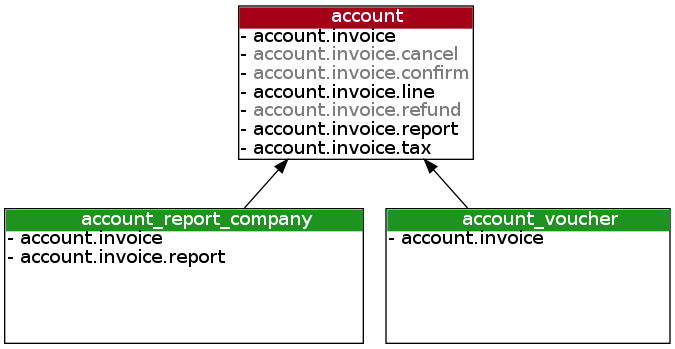
To display attributes, use the attrs_whitelist parameter. A wildcard is used here to show attributes of all models (but you can specify which models you want):
>>> graph = oerp.inspect.relations(['res.partner'], whitelist=['res.partner*'], blacklist=['res.partner.bank'], attrs_whitelist=['*'])
>>> graph.write('rel_res_partner_v3.png', format='png')

To hide attributes of some models, you can use the attrs_blacklist parameter:
>>> graph = oerp.inspect.relations(['res.partner'], whitelist=['res.partner*'], blacklist=['res.partner.bank'], attrs_whitelist=['*'], attrs_blacklist=['res.partner'])
>>> graph.write('rel_res_partner_v4.png', format='png')
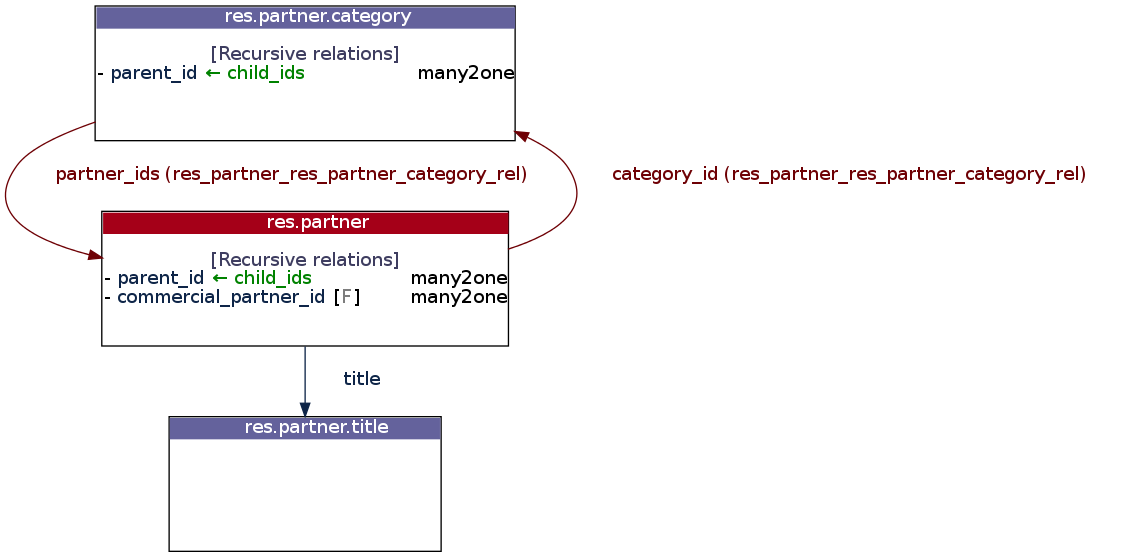
Also, some configuration options can be set through the config parameter. Here is how to display many2many table names:
>>> config = {'show_many2many_table': True}
>>> graph = oerp.inspect.relations(['res.partner'], whitelist=['res.partner*'], blacklist=['res.partner.bank'], config=config)
>>> graph.write('rel_res_partner_v5.png', format='png')
For more details, take a look at the relations method documentation.
Draw a graph of module dependencies
Note
This functionality requires the installation of pydot.
You will be able to generate a graphic representing dependencies between all modules with the dependencies method:
>>> graph = oerp.inspect.dependencies()
>>> graph.write('dependencies_v1.png', format='png')

By default all installed modules are shown on the resulting graph, the red ones can be seen as root modules (they depend on no module in the current graph). Assume we have installed the Accounting and Finance application, and want to only display dependencies related to the account module:
>>> graph = oerp.inspect.dependencies(['account'])
>>> graph.write('dependencies_v2.png', format='png')
This time the root module is account. Modules may also contain data models. To highlight some of them among the modules, set the models and models_blacklist parameters with one or several patterns (a joker * can be used):
>>> graph = oerp.inspect.dependencies(['account'], models=['account.invoice.*'])
>>> graph.write('dependencies_v3.png', format='png')

Modules related to the matching models are shown in green (in addition to the red one). It is possible to display transient models too through the show_transient_model configuration option (displayed in gray in the following graph):
>>> config = {'show_transient_model': True}
>>> graph = oerp.inspect.dependencies(['account'], models=['account.invoice.*'], config=config)
>>> graph.write('dependencies_v4.png', format='png')

To hide “noisy” modules and restrict the resulting graph only to data models that interest you, add the restrict=True parameter:
>>> config = {'show_transient_model': True}
>>> graph = oerp.inspect.dependencies(['account'], ['account.invoice.*'], restrict=True, config=config)
>>> graph.write('dependencies_v5.png', format='png')
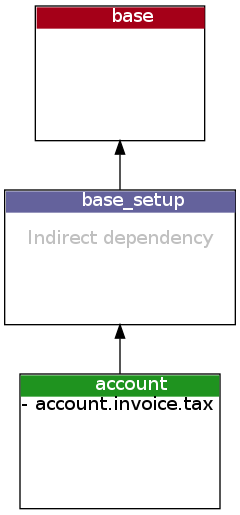
Even in restricted mode, root modules which are not concerned by matching models are always displayed. Also, if no dependency can be satisfied between modules, the method will try to add one. For instance, the base module have no account.invoice.tax model, and account does not directly depends on base, so a dependency between base and account should be added to display a suitable graph:
>>> graph = oerp.inspect.dependencies(['base'], ['account.invoice.tax'], restrict=True)
>>> graph.write('dependencies_v6.png', format='png')
For more details, take a look at the dependencies method documentation.
Scan the views of data models to list on_change methods
on_change functions of a model can be listed with the scan_on_change method. Each detected function can be present on several views:
>>> oerp.inspect.scan_on_change(['res.users'])
{'res.users': {'on_change_company_id': {'base.view_users_form_simple_modif': {'company_id': ['company_id']},
                                        'mail.view_users_form_simple_modif_mail': {'company_id': ['company_id']}},
               'onchange_state': {'base.view_users_simple_form': {'state_id': ['state_id']}}}}
The dictionary returned is formatted as follows: {model: {on_change: {view_name: field: [args]}}}, e.g. the onchange_state method is set on the state_id field of the view base.view_users_simple_form, and take the same field as parameter.
Save the session to open it quickly later (New in version 0.8)
Once you are authenticated with your OERP instance, you can save these connection information under a code name and use this one to quickly instanciate a new OERP class:
>>> import oerplib
>>> oerp = oerplib.OERP('localhost')
>>> user = oerp.login('admin', 'admin', 'my_database')
>>> oerp.save('foo')
By default, these informations are stored in the ~/.oerplibrc file. You can however use another file:
>>> oerp.save('foo', '~/my_own_oerplibrc')
Then, use the oerplib.OERP.load() class method:
>>> import oerplib
>>> oerp = oerplib.OERP.load('foo')
Or, if you have saved your configuration in another file:
>>> oerp = oerplib.OERP.load('foo', '~/my_own_oerplibrc')
You can check available sessions with oerplib.OERP.list(), and remove them with oerplib.OERP.remove():
>>> oerplib.OERP.list()
['foo']
>>> oerplib.OERP.remove('foo')
>>> 'foo' not in oerplib.OERP.list()
True
Change the timeout
By default, the timeout is set to 120 seconds for all RPC requests. If your requests need a higher timeout, you can set it through the oerplib.OERP.config property:
>>> oerp.config['timeout']
120
>>> oerp.config['timeout'] = 300  # Set the timeout to 300 seconds
![]()
Table Of Contents
- Tutorials
Previous topic
Download and install instructions
Next topic
Frequently Asked Questions (FAQ) (New in version 0.8)