Face Landmark Detection Using Python and Bob
bob.ip.flandmark detects 8 coordinates of important keypoints in frontal human faces.
To properly work, the keypoint localizer requires the input of an image (of type uint8, gray-scaled) and of a bounding box describing a rectangle where the face is supposed to be located in the image (see bob.ip.flandmark.Flandmark.locate()).
The keypoints returned are, in this order:
- [0]
- Face center
- [1]
Canthus-rl (inner corner of the right eye).
Note
The “right eye” means the right eye at the face w.r.t. the person on the image. That is the left eye in the image, from the viewer’s perspective.
- [2]
- Canthus-lr (inner corner of the left eye)
- [3]
- Mouth-corner-r (right corner of the mouth)
- [4]
- Mouth-corner-l (left corner of the mouth)
- [5]
- Canthus-rr (outer corner of the right eye)
- [6]
- Canthus-ll (outer corner of the left eye)
- [7]
- Nose
Each point is returned as tuple defining the pixel positions in the form (y, x).
The input bounding box describes the rectangle coordinates using 4 values: (y, x, height, width).
Square bounding boxes, i.e. when height == width, will give best results.
If you don’t know the bounding box coordinates of faces on the provided image, you will need to either manually annotate them or use an automatic face detector. Bob’s Face Detection Routines provides an easy to use frontal face detector. The code below shall detect most frontal faces in a provided image:
>>> import bob.io.base
>>> import bob.io.image
>>> import bob.ip.facedetect
>>> lena = bob.io.base.load(get_file('lena.jpg'))
>>> bounding_box, quality = bob.ip.facedetect.detect_single_face(lena)
>>> # scale the bounding box to cover more of the face
>>> bounding_box = bounding_box.scale(1.2, True)
>>> y, x = bounding_box.topleft
>>> height, width = bounding_box.size
>>> width = height  # make it square
>>> print((y, x, height, width))
(...)
Note
To enable the bob.io.base.load() function to load images, bob.io.image must be imported, see Bob’s I/O Routines for Images of Various type.
Once in possession of bounding boxes for the provided (gray-scaled) image, you can find the keypoints in the following way:
>>> import bob.ip.color
>>> from bob.ip.flandmark import Flandmark
>>> localizer = Flandmark()
>>> lena_gray = bob.ip.color.rgb_to_gray(lena)
>>> keypoints = localizer.locate(lena_gray, y, x, height, width)
>>> keypoints
array([[...]])
You can use the package bob.ip.draw to draw the rectangles and key-points on the target image. A complete script would be something like:
from bob.ip.flandmark import Flandmark
from bob.ip.draw import box, cross
from bob.ip.color import rgb_to_gray
from bob.ip.facedetect import detect_single_face
import bob.io.image
def get_data(f):
from os.path import join
from pkg_resources import resource_filename
from bob.io.base import load
return load(resource_filename('bob.ip.flandmark', join('data', f)))
lena = get_data('lena.jpg')
lena_gray = rgb_to_gray(lena)
bounding_box, quality = detect_single_face(lena)
bounding_box = bounding_box.scale(1.2, True)
y, x = bounding_box.topleft
height, width = bounding_box.size
width = height
# x, y, width, height = [214, 202, 183, 183] # Manual annotations
localizer = Flandmark()
keypoints = localizer.locate(lena_gray, y, x, height, width)
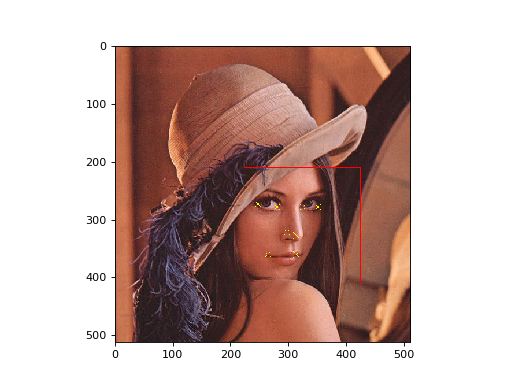
# draw the keypoints and bounding box
box(lena, (y, x), (height, width), (255, 0, 0)) # red bounding box
for k in keypoints:
cross(lena, k.astype(int), 5, (255, 255, 0)) # yellow key points
bob.io.image.imshow(lena)
(Source code, png, hires.png, pdf)
